TheaterLog
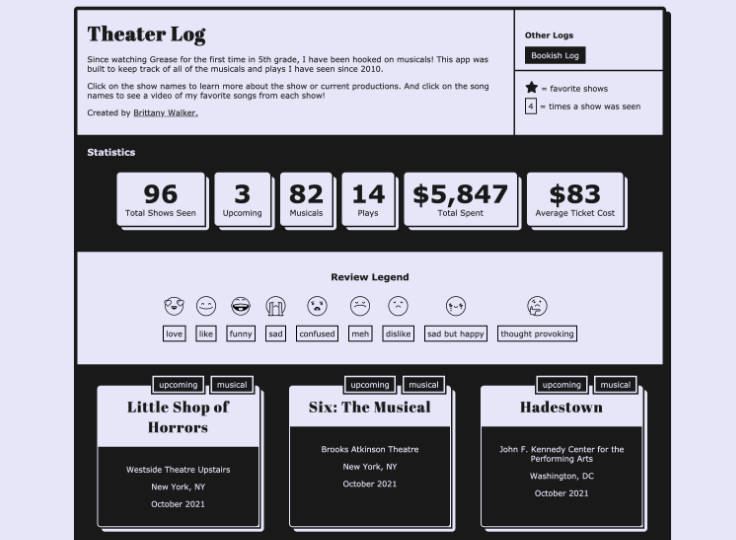
TheaterLog is a log of all of the musicals and plays I have seen since 2010.

This is the project for this blog post.
Features
The tracker is built using Vue.js and Contentful. The site consists of Show Cards that are created for each show seen. In the top hero section, there are statistics (number of shows seen, number of musicals seen, etc) as well as a guide to the review emojis.
Show Cards
Each show generates a card that includes the following:
- The show name
- The theater and city of the show
- The month and year
- A label indicating if the show is a musical or a play
- Opinion Stickers:
- A star if a show is a favorite
- An emoji representing my review of the show
- A numbered card displaying the number of times I have seen that particular show
- If a musical, my favorite song from the show (at the time of viewing) will be displayed.
Build your own tracker
If you’d like to create your own tracker, check out the steps below. You can track movies, TV shows, songs and much more if musicals are not your thing. Follow this setup guide to get your own project up and running and customize it to your needs.
The guide will walk you through the following:
- Getting started with Contentful
- Setting up the code
- Importing the content model and example content into your own Contentful space
- Suggestions for customization
Read this blog post to learn more about how I integrated Contentful into this project.
Step 1: Get the code
Fork this repository to your GitHub account, and clone your forked repo to your local machine using git or the GitHub CLI.
Step 2: Get Contentful
Create your Contentful account. Sign up here.
Step 3: Get credentials
- Create a new space inside your Contentful account.
- Go to Settings > General Settings and make a note of the Space ID.
- Go to Settings > API keys and generate an access token for the Content Delivery API.
- Create an
.envfile at the root of your project. - Copy the variables in
.env.local.exampleinto your.envfile. - Add your Space ID and access token to
.env.
Step 4: Install the Contentful CLI
Using homebrew:
brew install contentful-cli
Using npm:
npm install -g contentful-cli
Using yarn:
yarn global add contentful-cli
Step 5: Authenticate with the CLI
Run contentful login in your terminal and follow the instructions in your browser and in the terminal.
Step 6: Run the import
Import the content model and example entries to your Contentful space. This will import a content model for theater shows and sample entries. You can modify these entries to fit your own personal tracker after import.
Run the following command in your terminal, ensuring you switch out SPACE_ID for your new Space ID.
# navigate to the setup folder within your project
cd /path/to/repo/theatherlog/setup

contentful space import --space-id SPACE_ID --content-file contentful-export.json
Access the Contentful CLI docs on importing/exporting data here.
The terminal will do some fancy things. If all looks good – refresh Contentful in your browser and you’ll find the content model and example entries have been imported for you! ???
Step 7: Run the application
To run the project on your local machine, open a new termimal window, navigate to the project and run the following:
npm install
npm run serve