Vue Tables 2
A Vue.js 2 grid Tables components.
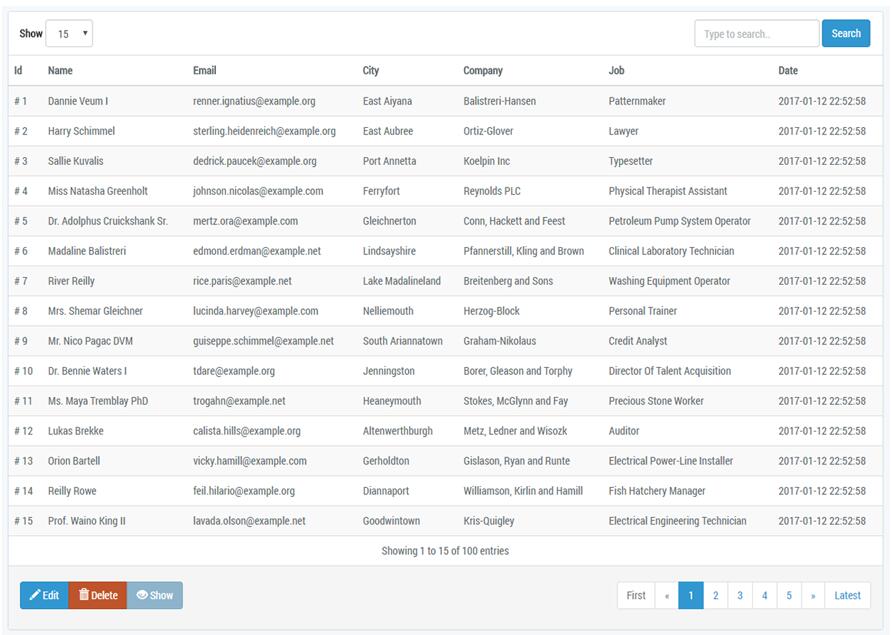
Live Demo
https://jsfiddle.net/matfish2/823jzuzc/
Usage
Dependencies
- Vue.js (>=2.0)
- Server Side: axios OR vue-resource (>=0.9.0) OR jQuery for the AJAX requests
Compatibility
- Vuex (>=2.0)
- Bootstrap 3 compatible html output
Installation
npm install vue-tables-2
Require the script:
import {ServerTable, ClientTable, Event} from 'vue-tables-2';
Register the component(s)
Vue.use(ClientTable, [options], [useVuex], [customTemplate]);
Or/And:
Vue.use(ServerTable, [options], [useVuex], [customTemplate]);
-
useVuexis a boolean indicating whether to usevuexfor state management, or manage state on the component itself.
If you set it totrueyou must add anameprop to your table, which will be used to to register a module on your store.
Usevue-devtoolsto look under the hood and see the current state. -
customTemplateargument allows you to pass a custom template for the entire table.
You can find the main template file underlib/template.js, which in turn requires the partials in thetemplatefolder.
The template is written usingjsx, so you will need a jsx compiler to modify it (the package is using the compiled version under thecompiledfolder).
Copy it to your project and modify to your needs.
Note: The template file is a function that receives a
sourceparameter (clientorserver). E.g:
Vue.use(ClientTable, {}, false, require('./template.js')('client'))
Client Side
Add the following element to your page wherever you want it to render.
Make sure to wrap it with a parent element you can latch your vue instance into.
<div id="people">
  <v-client-table :data="tableData" :columns="columns" :options="options"></v-client-table>
</div>
Create a new Vue instance (You can also nest it within other components). An example works best to illustrate the syntax:
new Vue({
el:"#people",
data: {
columns: ['id','name','age'],
tableData: [
{id:1, name:"John",age:"20"},
{id:2, name:"Jane",age:"24"},
{id:3, name:"Susan",age:"16"},
{id:4, name:"Chris",age:"55"},
{id:5, name:"Dan",age:"40"}
],
options: {
// see the options API
}
}
});
You can access the filtered dataset at any given moment by fetching the filteredData computed property of the table, using ref as a pointer (this.$refs.myTable.filteredData);
Important: when loading data asynchronously add a
v-ifconditional to the component along with someloadedflag, so it will only compile once the data is attached.
Server side
<div id="people">
  <v-server-table url="/people" :columns="columns" :options="options"></v-server-table>
</div>
Javascript:
new Vue({
el: "#people",
data: {
columns: ['id','name','age'],
options: {
// see the options API
}
}
});
All the data is passed in the following GET parameters:
query,limit,page,orderBy,ascending,byColumn.
You need to return a JSON object with two properties:
data:array- An array of row objects with identical keys.count:number- Total count before limit.
Note: If you are calling a foreign API or simply want to use your own keys, refer to the
responseAdapteroption.
Custom Request Function
by default the library supports JQuery, vue-resource and axios as ajax libraries.
If you wish to use a different library, or somehow alter the request (e.g add auth headers, or manipulate the data) use the requestFunction option. E.g:
options:{
  requestFunction: function(data) {
    return axios.get(this.url, { params: data }).catch(function (e) {
      this.dispatch('error', e);
    }.bind(this));
}
}
Implementations
I have included an Eloquent implementation for Laravel Users.
If you happen to write other implementations for PHP or other languages, a pull request would be most welcome, under the following guidelines:
- Include the class under
./server/{language}. - Name it according to convention:
{concrete}VueTables. - if this is the first implementation in this language add an interface similar to the one found in the PHP folder.
- Have it implement the interface.
- TEST IT.
Templates
Templates allow you to wrap your cells with vue-compiled HTML.
Their syntax is similar to that of render functions, as it leverages the virtual DOM to bind the templates into the main table template.
JSX
It is recommended to use JSX, which closely resembles HTML, to write the templates (To compile jsx you need to install the vue jsx transform).
E.g.:
data : {
columns: ['erase'],
options: {
...
templates: {
erase: function(h, row) {
return <delete id={row.id}></delete>
}
}
...
}
}
The first parameter is the h scope used to compile the element. It MUST be called h.
The second parameter gives you access to the row data.
In addition a this context will be available, which refers to the root vue instance. This allows you to call your own instance methods directly.
Note: when using a .vue file jsx must be imported from a dedicated .jsx file in order to compile correctly. E.g
edit.jsx
export default function(h, row) {
return <a class='fa fa-edit' href={'#/' + row.id + '/edit'}></a>
}
app.vue
<script>
  import edit from './edit'

  templates: {
   edit
 }
</script>
Vue Component
A Second option to for creating templates is to encapsulate the template within a component and pass the name. The component must have a data property, which will receive the row object. E.g:
Vue.component('delete', {
props:['data'],
template:`<a class='delete' @click='erase'></a>`,
methods:{
erase() {
let id = this.data.id; // delete the item
}
}
});
options: {
...
templates: {
erase: 'delete'
}
...
}
This method allows you to also use single page .vue files for displaying the template data
E.g:
edit.vue
<template>
  <a class="fa fa-edit" :href="edit(data.id)">Edit</a>
</template>
<script>
  export default {
    props:['data'],
  }
</script>
app.vue
<script>
  import edit from './edit'

  templates:{
   edit
 }
</script>
Scoped Slots
If you are using Vue 2.1.0 and above, you can use scoped slots to create templates:
<v-client-table :data="entries" :columns="['id', 'name' ,'age', 'edit']">
  <template slot="edit" scope="props">
    <div>
      <a class="fa fa-edit" :href="edit(props.row.id)"></a>
    </div>
  </template>
</v-client-table>
Important:
- To use components in your templates they must be declared globally using
Vue.component(). - Templates must be declared in the
columnsprop
Note: Don't include HTML directly in your dataset, as it will be parsed as plain text.
CSS Note: to center the pagination apply
text-align:centerto the wrapping element
Child Rows
Child rows allow for a custom designed output area, namely a hidden child row underneath each row, whose content you are free to set yourself.
When using the childRow option you must pass a unqiue id property for each row, which is used to track the current state.
If your identifer key is not id, use the uniqueKey option to set it.
The syntax is identincal to that of templates:
options:{
...
childRow: function(h, row) {
return <div>My custom content for row {row.id}</div>
}
...
}
Or you can pass a component name: (See Templates above for a complete example)
options:{
...
childRow: 'row-component'
...
}
When the plugin detects a childRow function it appends the child rows and prepends to each row an additional toggler column with a span you can design to your liking.
Example styling (also found in style.css):
.VueTables__child-row-toggler {
width:16px;
height:16px;
line-height: 16px;
display: block;
margin: auto;
text-align: center;
}

.VueTables__child-row-toggler--closed::before {
content: "+";
}

.VueTables__child-row-toggler--open::before  {
content: "-";
}
You can also trigger the child row toggler programmtically. E.g, to toggle the row with an id of 4:
this.$refs.myTable.toggleChildRow(4); // replace myTable with your own ref
Methods
Call methods on your instance using the ref attribute.
setPage(page)setLimit(recordsPerPage)setOrder(column, isAscending)setFilter(query)-queryshould be a string, or an object iffilterByColumnis set totrue.refresh()Server component only
Events
Using Custom Events (For child-parent communication):
<v-server-table :columns="columns" url="/getData" @loaded="onLoaded"></v-server-table>
- Using the event bus:
Event.$on('vue-tables.loaded', function (data) {
// Do something
});
Note: If you are using the bus and want the event to be "namespaced", so you can distinguish bewteen different tables on the same page, use the name prop.
The event name will then take the shape of vue-tables.tableName.eventName.
- Using Vuex:
mutations:{
['tableName/LOADED'] (state, data) {
// Do something
}
}
vue-tables.filter/tableName/FILTER
Fires off when a filter is changed. Sends through the name and value in case of column filter, or just the value in case of the general filter
vue-tables.filter::colName
Same as above, only this one has the name attached to the event itself, and only sends through the value.
Releveant only for non-vuex tables with filterByColumn set to true.
vue-tables.loading/tableName/LOADING(server)
Fires off when a request is sent to the server. Sends through the request data.
vue-tables.loaded/tableName/LOADED(server)
Fires off after the response data has been attached to the table. Sends through the response.
You can listen to those complementary events on a parent component and use them to add and remove a loading indicator, respectively.
vue-tables.pagination/tableName/PAGINATION
Fires off whenever the user changes a page. Send through the page number.
vue-tables.error/tableName/ERROR(server)
Fires off if the server returns an invalid code. Sends through the error
vue-tables.row-click/tableName/ROW_CLICK
Fires off after a row was clicked. sends through the row and the mouse event.
When using the client component, if you want to recieve the original row, so that it can be directly mutated, you must have a unique row identifier.
The key defaults to id, but can be changed using the uniqueKey option.
Custom Filters
Custom filters allow you to integrate your own filters into the plugin using Vue's events system.
Client Side Filters
- use the
customFiltersoption to declare your filters, following this syntax:
customFilters: [{
name:'alphabet',
callback: function(row, query) {
return row.name[0] == query;
}
}]
- Using the event bus:
Event.$emit('vue-tables.filter::alphabet', query);
- Using
vuex:
this.$store.commit('myTable/SET_CUSTOM_FILTER', {filter:'alphabet', value:query})
Server Side Filters
A. use the customFilters option to declare your filters, following this syntax:
customFilters: ['alphabet','age-range']
B. the same as in the client component.
List Filters
When filtering by column (option filterByColumn:true), the listColumns option allows for filtering columns whose values are part of a list, using a select box instead of the default free-text filter.
For example:
options: {
filterByColumn: true,
listColumns: {
animal: [
{ id: 1, text: 'Dog' },
{ id: 2, text: 'Cat' },
{ id: 3, text: 'Tiger' },
{ id: 4, text: 'Bear' }
]
}
}
Note: The values of this column should correspond to the
id's passed to the list.
They will be automatically converted to their textual representation.
Custom Sorting
Client Side Sorting
Sometimes you may one to override the default sorting logic which is applied uniformly to all columns.
To do so use the customSorting option. This is an object that recieves custom logic for specific columns.
E.g, to sort the name column by the last character:
customSorting:{
name: function(ascending) {
return function(a, b) {
var lastA = a.name[a.name.length-1].toLowerCase();
var lastB = b.name[b.name.length-1].toLowerCase();

if (ascending)
return lastA <= lastB?1:-1;

return lastA >= lastB?1:-1;
}
}
}
Server Side Sorting
This depends entirely on your backend implemetation as the library sends the sorting direction trough the request.
Multiple Sorting
Multiple sorting allows you to sort recursively by multiple columns.
Simply put, when the primary column (i.e the column the user is currently sorting) has two or more identical items, their order will be determined by a secondary column, and so on, until the list of columns is exhausted.
Example usage:
{
  ...
  multiSorting:{
  name:[
  {
  column:'age',
  matchDir:false
},
{
 column:'birth_date',
 matchDir:true
}
]
}
...
}
The above code means that when the user is sorting by name and identical names are compared, their order will be determined by the age column. If the ages are also identical the birth_date column will determine the order.
The matchDir property tells the plugin whether the secondary sorting should match the direction of the primary column (i.e ascending/descending), or not.
In addition to programmatically setting the sorting in advance, by default the user can also use Shift+Click to build his own sorting logic in real time.
To disable this option set clientMultiSorting to false.
On the server component this behaviour is disabled by default, because it requires addtional server logic to handle the request.
To enable it set serverMultiSorting to true. The request will then contain a multiSort array, if applicable.