Vue Use State Effect
CAUTION: Built and tested for/with Vue 3 and/or Nuxt 3 (RC-2).
Fast and small library (composable), built on top of the native EffectScope Vue 3 API that will provide safe and sharable (across the app) state for your local composables and functions. It might be a good replacement / alternative for Vuex or Pinia state management, if you need smaller and less extensive solution.
Check out the Stackblitz Nuxt 3 demo here. ?
Motivation / Story
.
Check out below how to use it, provided examples and demos where you can see it in action. Any questions, problems, errors? Please check out the Q&A section first, then if you still will be unhappy add a new Issue. Thanks and Enjoy!
Installation
Usage
for some wider perspective.
Configuration (API)
name
-
type:
String | 'state' -
default:
'state' -
description: name of composable state object that you’ll be referring to inside your components, if not defined by default your state object will get
statekey, please note that it’s not read automatically and that’s because of application build mode functions name-spaces formatting
debug
-
type:
Boolean -
default:
false -
description: if set to
trueit will turn on the debug mode, you will be able to see the shared composable body / state -
tip: you can turn it on for the development mode
{ debug: process.env.NODE_ENV === 'development' }
destroy
-
type:
Boolean|'custom' -
default:
false -
description: if set to
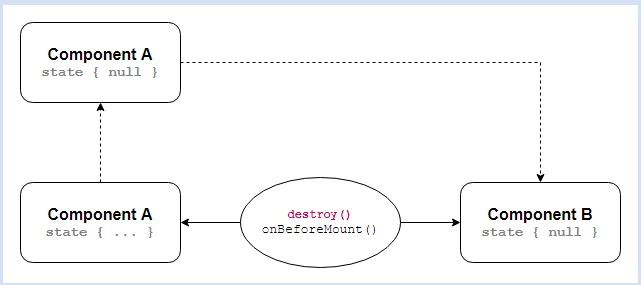
truecomposable state will be destroyed after componentonBeforeUnmounthook, if set tocustomit will be waiting for custom setup (described below) and destroyedonBeforeMounthook
Destroy Destination (Custom) ✨ from 0.1.2
You can decide where the state will be destroyed (re-initialized). You will achieve this by passing special property and corresponding label that will point place / component where it should be executed.
For this one you can pass inline options to the useStateEffect composable while invoking within the components.
export type UseStateEffectOptions<T = any> = {
  readonly destroyLabels: string[]
  readonly props: ExtractPropTypes<{ stateEffectDestroyLabel: string } | T>
}
Let’s say that SharedStateComponent.vue component is reused across the application, and you’re displaying here some shared data from the useSharedState composable. And it will always be updated and aligned with the state unless the passed property from the parent component will not meet the same custom label defined as a destroyLabels (you can use multiple) with your composable invocation. Like this.
<!-- SharedStateComponent.vue  -->

<script setup lang="ts">
import { useSharedState } from '@composables/useSharedState'

const props = defineProps({
  stateEffectDestroyLabel: { type: String, default: 'Label' },
})

const {
  sharedState: { data },
} = useSharedState({ destroyLabels: ['CustomLabel'], props })
</script>
*please check the example for better context
And this is how you can use it along with the real component or page.
<!-- New Page | New.vue -->

<template>
  <shared-state-component state-effect-destroy-label="CustomLabel" />
</template>
So while this New.vue component will be initialized (just before mounting) the state that you’ve established in the SharedStateComponent.vue component will be destroyed (re-initialized).
WARNING!
Please don’t try to destroy the state in the same component where you’re updating (setting) the new data for it. It will be caught with the same lifecycle loop and destroyed after component termination. Finally, passed as empty.
To destroy state just after component unmount event you can (and probably you should ?) use straight form of the destroy feature with
truevalue.
Great! You can check it in action with the special Nuxt 3 StackBlitz demo.
Example
section below for more details.
OK – first – let’s create a local composable.
/* composables/useSharedState.ts */

import { ref } from 'vue'

const sharedState = () => {
  const state = ref({
    test: '? Initial state value.',
  })
  const updateState = () => {
    state.value = {
      test: '? Updated state value.',
    }
  }
  return {
    state,
    updateState,
  }
}
What you can see here is a simple state ref object to which we’ve passed test string. Then we have method that will update this state. Please notice that we’re not exporting this method, we’re not creating any external or global state objects, everything is locked inside the local composition function.
Now, import and use the vue-use-state-effect composable.
/* composables/useSharedState.ts */

import { useStateEffect } from 'vue-use-state-effect'

/* your composable logic  */

export const useSharedState: any = useStateEffect(sharedState, {
  name: 'sharedState',
  debug: true,
  destroy: false,
})
OK, great. Let’s use it along with some page / component. Create one e.g. home.vue.
<!-- Home Page | Home.vue -->

<template>
  <div>{{ test }}</div>
  <button @click="updateState">update state</button>
</template>

<script setup lang="ts">
import { computed } from 'vue'
import { useSharedState } from '@composables/useSharedState'

const {
  sharedState: { state, updateState },
} = useSharedState()

const test = computed(() => state.value.test) // '? Initial state value.',
</script>
Please note that we’re using <script setup> notation here, you can find more about it in this article. Right, what you can see here is that we’re importing our newly shared composable with state data. With the state we have the updateState method, that will update the state – of course. Name of the parent object (sharedState) was defined within the configuration. Now you can create new page / component and read saved or updated state along with the different context. Like this.
<!-- New Page | New.vue -->

<template>
  <div>{{ test }}</div>
</template>

<script setup lang="ts">
import { ref } from 'vue'
import { useSharedState } from '@composables/useSharedState'

const {
  sharedState: { state },
} = useSharedState()

/* you can use watch here as well */
const test = ref(state.value.test) // '? Updated state value.',
</script>
Tip: because of asynchronously created components (especially in Nuxt), if you want to destroy state after the component or page were unmounted – where this state was used – it’s good to listen for the new one within the onMounted hook.
Demo
Check out the Stackblitz Nuxt 3 demo here. ?
You can also try it out locally with the simple apps (Vue 3 and Nuxt 3) in the demo folders. You can fire it up manually or from the main folder of this repository, by using these two commands*.
# vue demo
yarn demo:vue
# nuxt demo
yarn demo:nuxt
*using yarn here, but you can still change it to npm
for API definitions.
Contribution: Please add Pull Request or Issue to introduce some changes or fixes.
Support: Want to support? Buy me a coffee or sponsor me via GitHub.
