vue
Contextmenu component for vue2
Ant Design
Ant Design of Vue
overview


Use Setup
install vue-contextmenu-antd
npm install vue-contextmenu-antd –save
Vue mount
// mount with global
import VueContextMenu from 'vue-contextmenu-antd'
Vue.use(VueContextMenu)
Use in SPA
<template>
<div id="app" @contextmenu="showMenu"
    style="width: 100px;height: 100px;margin-top: 20px;background: red;">
    <vue-context-menu :contextMenuData="contextMenuData"
        @savedata="savedata"
        @newdata="newdata"></vue-context-menu>
</div>
</template>
<script>
export default {
  name: 'app',
  data () {
    return {
      	// contextmenu data (菜单数据)
      contextMenuData: {
        // the contextmenu name(@1.4.1 updated)
        menuName: 'demo',
        // The coordinates of the display(菜单显示的位置)
        axis: {
          x: null,
          y: null
        },
        // Menu options (菜单选项)
        menulists: [{
          fnHandler: 'savedata', // Binding events(绑定事件)
          icoName: 'fa fa-home fa-fw', // icon (icon图标 )
          btnName: 'Save' // The name of the menu option (菜单名称)
        }, {
            fnHandler: 'newdata',
            icoName: 'fa fa-home fa-fw',
            btnName: 'New'
        }]
      }
    }
  },
  methods: {
    showMenu () {
        event.preventDefault()
        var x = event.clientX
        var y = event.clientY
        // Get the current location
      this.contextMenuData.axis = {
        x, y
      }
    },
    savedata () {
      alert(1)
    },
    newdata () {
      console.log('newdata!')
    }
  }
}
</script>
Use in SPA(List Rendering)
<template>
<div style="position: fixed;left:0px;top:0;">
<div
@contextmenu="showMenu(index)"
style="width: 100px;height: 100px;margin-top: 20px;background: red;"
v-for="(n, index) in 4"
:key="n"
>
<vue-context-menu
:contextMenuData="contextMenuData"
:transferIndex="transferIndex"
@Handler1="Handler_A(index)"
@Handler2="Handler_B(index)"
@Handler3="Handler_C(index)"
@Handler4="Handler_D(index)"
@Handler5="Handler_E(index)"
></vue-context-menu>
</div>
</div>
</template>
<script>
export default {
name: "app",
data() {
return {
transferIndex: null, // Show the menu that was clicked
contextMenuData: {
menuName: "demo",
axis: {
x: null,
y: null
},
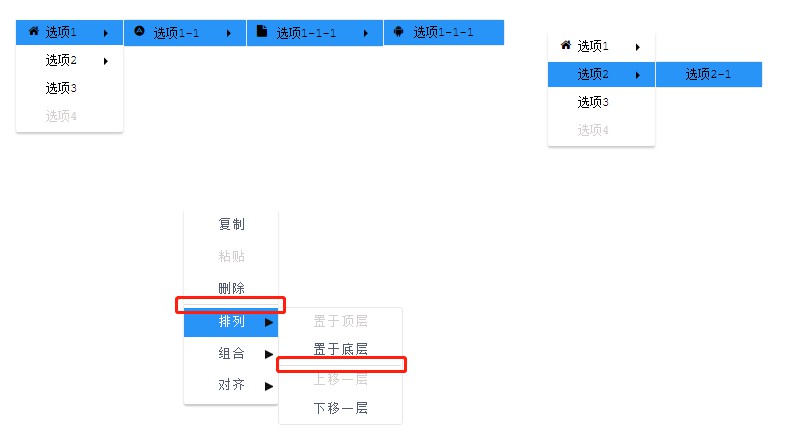
menulists: [
{
btnName: "选项1",
icoName: "fa fa-home fa-fw",
children: [
{
icoName: "fa fa-adn",
btnName: "选项1-1",
// submenu (子菜单)
children: [
{
icoName: "fa fa-file",
// submenu (子菜单)
btnName: "选项1-1-1",
children: [
{
icoName: "fa fa-android",
fnHandler: "Handler1",
btnName: "选项1-1-1"
}
]
}
]
}
]
},
{
btnName: "选项2",
children: [
{
fnHandler: "Handler5",
btnName: "选项2-1"
}
]
},
{
btnName: "选项3",
fnHandler: "Handler4"
},
{
btnName: "选项4",
disabled: true
}
]
}
};
},
methods: {
showMenu(index) {
this.transferIndex = index; // tranfer index to child component
event.preventDefault();
var x = event.clientX;
var y = event.clientY;
this.contextMenuData.axis = {
x,
y
};
},
Handler_A (index) {
console.log('index:', index, '选项1-1-1绑定事件执行');
},
Handler_B (index) {
console.log('index:', index, '选项1-1-2绑定事件执行');
},
Handler_C (index) {
console.log('index:', index, '选项1-2-1绑定事件执行');
},
Handler_D (index) {
console.log('index:', index, '选项1-2-2绑定事件执行');
},
Handler_E (index) {
console.log('index:', index, '选项2-1绑定事件执行');
}
}
};
</script>
<style>
* {
margin: 0;
padding: 0;
}
</style>
options
- fnHandler: ‘copyItem’, // Binding events(绑定事件)
- btnName: ‘复制’, // The name of the menu option (菜单名称)
- icoName: ‘copy’, //The name of the icon option (图标名称)
<a-icon type="copy" /> //Ant Design of Vue
- underline: true, //(是否需要分割线)
icon
use font Awesome,also you can use other UI components icon,for example elementUI.And add the icon class to “icoName”. if you set like (icoName: ‘el-icon-delete’), that will be add a “Trash” to your page.
you can add the style file into html like this:
<link href="//netdna.bootstrapcdn.com/font-awesome/4.7.0/css/font-awesome.min.css" rel="stylesheet">
also if you use like elementUI, maybe you can use by
import 'element-ui/lib/theme-chalk/index.css';