Create a Vue.js shopping cart
This guide contains instructions to create an online store application, including shopping cart and client authentication. At the end you will also find the instructions to deploy the application on Red Hat Openshift.
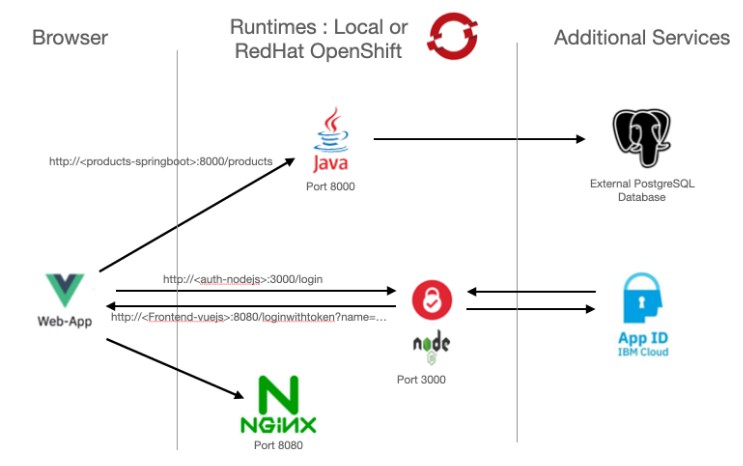
Architecture diagram:

If you are new to VueJS, here are some links to get started :
- https://travishorn.com/vue-online-store-with-shopping-cart-c072433f8d9e
- https://vuejs.org
- Learn Vuex in 15 minutes: https://www.youtube.com/watch?v=oxUyIzDbZts&t=240s
- https://vuex.vuejs.org/
1. Create a new Vue.js application
Prerequisites:
Install Node.js on your local machine (Mac, Windows, Linux) if not already present.
You need Node.js, since the libraries required for Vue are downloaded using node package manager (npm). Refer to https://nodejs.org/en/ to install Node.js.
# npm install -g @vue/cli

# vue create shopping-cart
-> manually select features
-> select Vuex and Router
-> Choose Version 2.x
(use default settings for all next interactive questions)
# cd shopping-cart
# npm run serve
2. Load products into store array (src/store/index.js)
Define products array in state, add async action to fetch products and add mutations to store products array (assuming a product web-service running locally)
If you don’t have a web-service yet, you can use e.g. “Mockoon” to quicky run a mockup service using a JSON data response with 3 products : expose the service on port 8000.
Check that your product service is working: http://localhost:8000/products !
[
  {
    "description": "3.0GHz Dual-core Haswell Intel Core i5 Turbo Boost up to 3.2 GHz, 3MB L3 cache 8GB (two 4GB SO-DIMMs) of 1600MHz DDR3 SDRAM",
    "id": 1,
    "price": 2399,
    "quantity": 10,
    "thumbnail_url": "https://macbookpics.s3.eu-de.cloud-object-storage.appdomain.cloud/img1.jpeg",
    "title": "macbook Retina 13.3' ME662 (2013)"
  },
  {
    "description": "Macbook Pro 13.3' Retina MF841LL/A Model 2015 Option Ram Care 12/2016",
    "id": 2,
    "price": 1199,
    "quantity": 15,
    "thumbnail_url": "https://macbookpics.s3.eu-de.cloud-object-storage.appdomain.cloud/img2.jpeg",
    "title": "Macbook Pro 13.3' Retina MF841LL/A"
  },
  {
    "description": "3.0GHz Dual-core Haswell Intel Core i5 Turbo Boost up to 3.2 GHz, 3MB L3 cache 8GB (two 4GB SO-DIMMs) of 1600MHz DDR3 SDRAM",
    "id": 3,
    "price": 1800,
    "quantity": 1,
    "thumbnail_url": "https://macbookpics.s3.eu-de.cloud-object-storage.appdomain.cloud/img3.jpeg",
    "title": "Macbook Pro 15.4' Retina MC975LL/A Model 2012"
  }
]
Edit src/store/index.js
Add 2 constants:
...
Vue.use(Vuex)

const url = "http://localhost:8000/products";
const headers = { Accept: "application/json" };
…
Replace the state, mutations and actions with the code below:
state: {
 products: [],
},
mutations: { //synchronous
	setProducts(state, payload) {
	  state.products = payload;
	}
},
actions: { //asynchronous
	async getProducts(state) {
	  const products = await fetch(url, { headers });
	  const prods = await products.json();
	  state.commit("setProducts", prods);
	  console.log(prods);
	}
},
3. Add code to App.vue to get the products at load time
Dispatch action to store to load the products – place the following code between </template> and <style>
<script>
export default {
  mounted(){
    this.$store.dispatch("getProducts");
  }
}
</script>
Now you can verify that the products are correctly loaded using the ‘VUE’ Chrome-Extension (look at the Vuex state variables). Also check the console log for possible errors. One error you might get is a CORS blocked error because of a Cross-Domain request to your product service. In order to solve this you can install the Cors Chrome extension https://chrome.google.com/webstore/detail/allow-cors-access-control/lhobafahddgcelffkeicbaginigeejlf and activate it. This works great in a development environment. Once we deploy to production, all components will be hosted on the same domain so that will not cause any problems. Alternatively you can also adapt your Mockoon service to return CORS headers upon request. To make this happen, goto the Mockoon ‘Environment Settings’ and enable CORS as well as ‘Add CORS headers’ to environment headers below’.
4. Add Bootstrap to your project
https://getbootstrap.com/docs/5.0/getting-started/introduction/
Within your public/index.html:
Add CSS link into <head> :
<link rel="stylesheet" href="https://cdn.jsdelivr.net/npm/[email protected]/dist/css/bootstrap.min.css">
Add Bootstrap bundle scripts into <body> :
<script src="https://code.jquery.com/jquery-3.5.1.slim.min.js"></script>
<script src="https://cdn.jsdelivr.net/npm/[email protected]/dist/js/bootstrap.bundle.min.js"></script>
5. Modify the src/views/Home.vue
Replace the existing code with the following:
<template>
    <h1>{{products}}</h1>
</template>

<script>
// @ is an alias to /src

export default {
  name: 'Home',
  computed: {
    products() {
      return this.$store.state.products;
    }
  },
  components: {

  }
}
</script>
Now you should see a JSON dump of the products on the home page.
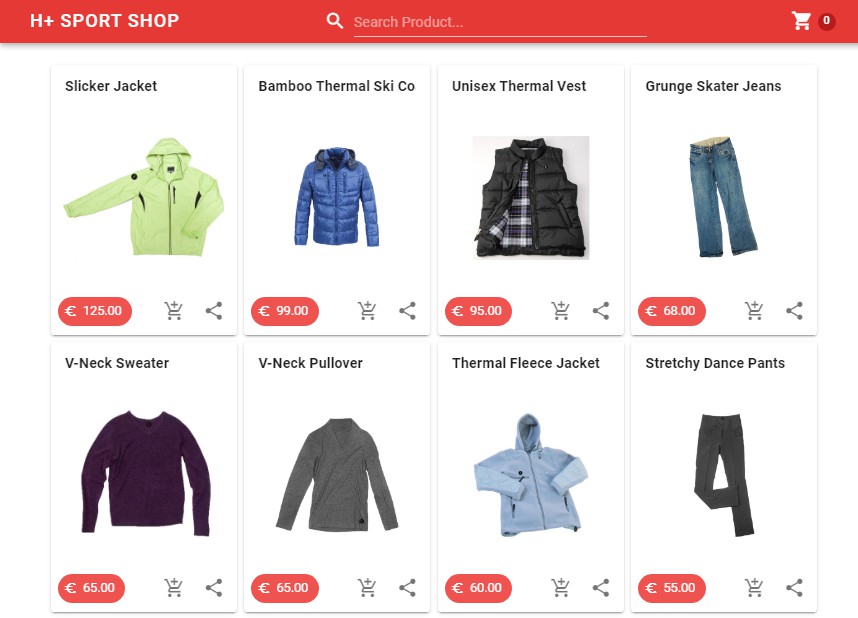
6. Format the JSON output into shoppingcards
Replace the template from Home.vue with:
<template>
  <div class="container">
    <div class="container">
      <div class="row">
        <Item v-for="product in products"
        :key="product.id"
        :item="product"/>
      </div>
    </div>
  </div>
</template>
You should see some error statements about the ‘Item’ component. We will solve this in the following sections.
7. Create a new empty file: ‘Item.vue’ in the src directory and modify ‘Home.vue’ to import it
In this step we will import the ‘Item.vue’ into ‘Home.vue’ and define it as a component for further use.
Add import statement: import Item from “@/Item.vue”
Add component:
components: {
  Item
}
The <script> in ‘Home.vue’ should now look like this:
<script>
// @ is an alias to /src
import Item from "@/Item.vue"
export default {
  name: 'Home',
  computed: {
    products() {
      return this.$store.state.products;
    }
  },
  components: {
    Item
  }
}
</script>
8. Add a Product card to Item.vue
More info on using Cards with Bootstrap: https://getbootstrap.com/docs/5.0/components/card/
<template>
<div class="card" style="width: 18rem;">
    <div class="card-body">
        <h5 class="card-title">Card title</h5>
        <h6 class="card-subtitle mb-2 text-muted">Card subtitle</h6>
        <p class="card-text">Some quick example text to build on the card title and make up the bulk of the card's content.</p>
        <a href="#" class="card-link">Card link</a>
        <a href="#" class="card-link">Another link</a>
	</div>
</div>
</template>
9. Also add the script-tag to Item.vue
<script>
export default {
    name: 'Item',
    props: ['item'],
}
</script>
You can now start correcting the card information with the item fields: e.g. Card title can be replaced with {{item.title}}… or copy the final result from the next step.
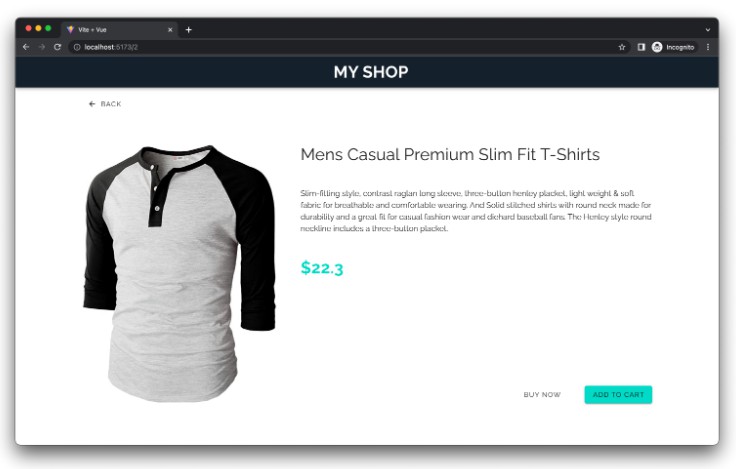
10. The final result should look like the following (including some styling and a filter for the product description):
<template>
<div class="col-sm-4 item">
  <div class="card text-center" >
    <div>
      <img :src="item.thumbnail_url" alt="" class="card-img-top grow">
    </div>
    <div class="card-body">
      <h5 class="card-title">{{ item.title }}</h5>
      <h6 class="card-subtitle mb-2 remain">{{ item.quantity }} left in stock</h6>
      <p class="card-text">{{ item.description | shortDescription }}</p>
      <div class="row">
        <p class="col-6 lead">${{ item.price }}</p>
        <p class="col-6">
          <button class="btn btn-success" :disabled="item.quantity === 0" @click="addToCart(item)">
            Add to cart
          </button>
        </p>
      </div>
    </div>
  </div>
</div>
</template>

<script>

export default {
    name: 'item',
    props: ['item'],
    data() {
        return {
            size: ''
        }
    },
    filters: {
        shortDescription(value) {
        if (value && value.length > 70) {
            return value.substring(0, 70) + '...';
        } else {
            return value;
        }
        }
    },
    methods: {
        addToCart(item) {
            this.$store.commit('addToCart',item)
        }
    }
}
</script>

<style scoped>

.remain {
  color: #d17581;
}

.grow {
  width: 90%;
  height: 90%;
  padding: 15px;
  transition: all .2s ease-in-out;
}

.grow:hover {
  transform: scale(1.1);
}

.item {
    display: flex;
    content: "";
    padding: 10px 10px;
}

</style>
11. Add a Navigation Header bar to the Store
- Create a NavHeader.vue file in the src directory
<template>
<nav class="navbar navbar-dark bg-dark">
    <div class="container">
        <router-link to="/" class="navbar-brand mr-auto">Blue Online Store</router-link>
    </div>
</nav>
</template>
- Add the NavHeader component to App.vue and import it.
<template>
  <div id="app">
    <NavHeader />
    <router-view/>
  </div>
</template>

<script>
import NavHeader from "@/NavHeader.vue"
export default {
  components: {
    NavHeader
  },
  mounted(){
    this.$store.dispatch("getProducts");
  }
}
</script>
12. Add a shopping cart
Create a ShoppingCart.vue in the src directory
<template>
<div>
<button class="btn btn-primary navbar-btn" data-toggle="modal" data-target="#shoppingCart">
<i class="fa fa-shopping-cart" aria-hidden="true"></i>
( {{ numInCart }} )
</button>
<div id="shoppingCart" class="modal fade">
<div class="modal-dialog">
<div class="modal-content">
<div class="modal-header">
<h5 class="modal-title">
<i class="fa fa-shopping-cart" aria-hidden="true"></i>
Shopping cart
</h5>
<button class="close" data-dismiss="modal">
×
</button>
</div>
<div class="modal-body">
<table class="table">
<tbody>
<tr v-for="(item,idx) in inCart" :key="idx">
<td>{{ item.title }}</td>
<td>${{ item.price }}</td>
<td>
<button class="btn btn-sm btn-danger" @click="removeFromCart(item)">×</button>
</td>
</tr>
<tr>
<th></th>
<th>${{ total }}</th>
<th></th>
</tr>
</tbody>
</table>
</div>
<div class="modal-footer">
<button class="btn btn-secondary" data-dismiss="modal">Keep shopping</button>
<button class="btn btn-primary" @click="checkout()">Check out</button>
</div>
</div>
</div>
</div>
</div>
</template>
<script>
export default {
name: 'ShoppingCart',
computed: {
inCart() {
return this.$store.getters.inCart;
},
numInCart() {
return this.inCart.length;
},
total() {
return this.inCart.reduce((acc, cur) => acc + cur.price, 0);
},
isAuthenticated() {
return this.$store.state.user.isAuthenticated;
},
},
methods: {
removeFromCart(item) {
this.$store.commit('removeFromCart', item);
},
checkout() {
if (this.isAuthenticated) {
if (this.numInCart == 0) {
alert('Your cart is empty!');
return
}
} else {
alert('Please login to checkout');
return
}
},
}
};
</script>
Add the following CSS into <head> of public/index.html to get the special icons such as a shopping cart:
<link rel="stylesheet" href="https://cdnjs.cloudflare.com/ajax/libs/font-awesome/4.7.0/css/font-awesome.min.css">
13. Replace store/index.js with following code:
The Vuex store will now also allow to :
- keep track of shopping-cart items
- authenticated user information
It also contains the functions to:
- add & remove cart items
- login & logout
import Vue from 'vue'
import Vuex from 'vuex'

Vue.use(Vuex)

const url = "http://localhost:8000/products";
const headers = { Accept: "application/json" };

export default new Vuex.Store({
  state: {
    products: [],
    inCart: [],
    user: {
      isAuthenticated: false,
      name: "",
      email: "",
      idToken: ""
    },
    endpoints: {
      login: "http://localhost:3000/login"
    },
   },
   getters: {
    products: state => state.products,
    inCart: state => state.inCart,
   },
   mutations: { //synchronous
     setProducts(state, payload) {
       state.products = payload;
     },
     addToCart(state, payload) {
      console.log(payload);
      state.inCart.push(payload);
     },
     removeFromCart(state, item) {
       state.inCart.splice(item, 1);
     },
     logout(state) {
      state.user.isAuthenticated = false;
      state.user.name = "";
      state.user.email ="";
      state.user.idToken ="";
     },
     login(state, payload) {
      state.user.isAuthenticated = true;
      state.user.name = payload.name;
      state.user.email =payload.email;
      state.user.idToken =payload.idToken;
     },
   },
   actions: { //asynchronous
     async getProducts(state) {
       const products = await fetch(url, { headers });
       const prods = await products.json();
       state.commit("setProducts", prods);
       console.log(prods);
     }
   },
  modules: {
  }
})
14. Update NavHeader.vue – replace existing code with:
<template>
<nav class="navbar navbar-expand-sm navbar-dark bg-dark" role="navigation">
  <div class="container">
    <router-link to="/" class="navbar-brand mr-auto">Blue Online Store</router-link>
      <ul class="navbar-nav mr-auto">
      </ul>
      <ul class="nav navbar-nav">
        <router-link to="/" tag="li" v-if="!isAuthenticated" class="nav-item" active-class="active">
          <a @click="onLoginClicked" class="nav-link">Login</a>
        </router-link>
        <li v-if="isAuthenticated" class="li-pointer nav-item">
          <div class="dropdown">
            <button class="btn btn-secondary dropdown-toggle" type="button" id="dropdownMenuButton" data-toggle="dropdown" aria-haspopup="true" aria-expanded="false">
              {{ getUserName() }}
            </button>
            <div class="dropdown-menu" aria-labelledby="dropdownMenuButton">
              <a class="dropdown-item" href="#">Account Settings</a>
              <a @click="onLogoutClicked" class="dropdown-item">Logout {{ userEmail }}</a>
            </div>
          </div>
        </li>
        <li>
          <ShoppingCart />
        </li>
      </ul>
  </div>
</nav>
</template>

<script>
import ShoppingCart from './ShoppingCart.vue';
export default {
  components: { ShoppingCart },
  name: 'NavHeader',
  computed: {
    userEmail() {
      return this.isLoggedIn ? this.currentUser.email : ''
    },
    isAuthenticated() {
      return this.$store.state.user.isAuthenticated;
    },
  },
  methods: {
    onLoginClicked() {
      window.location = this.$store.state.endpoints.login;
    },
    onLogoutClicked() {
      this.$store.commit("logout");
    },
    getUserName() {
      return this.$store.state.user.name;
    }
  }
}
</script>
Now you should have a working application. Verify the shopping cart works correctly by adding some items and check the contents of your shopping cart.
15. Add User Authentication functionality
For user authentication we will make use of the IBM “App ID” service and integrate it into our application.
First create a new “App ID” service instance in IBM Cloud. Make sure to select the ‘Frankurt (eu-de)’ region, select the “Graduated Tier” and give the ‘Service name’ a name that corresponds to your <Team name> so you can find it back afterwards.
Open the newly created Service instance:
- Add a new application
- Give it a name.
- Use “regularwebapp” as application type
When you click on the newly created app you should see a JSON structure with all info such as : clientId, tenantId and oAuthServerURL. You will need these values later !
As there is no direct integration available for VueJS we will make use of a separate NodeJS application which will expose an API for us to call and which will communicate with IBM “App ID”. NodeJS uses ‘openid-client’-package for oauth communication. The Vue.js application invokes a ‘login’ endpoint of this service. The authentication service triggers the OAuth dance and returns the tokens to the web application. After successful login the Vue.js web application retrieves the access token and stores it together with the user name and email address in the Vuex store.
Create a new node.js application in a directory/folder outside your shopping cart application/folder
This node.js application will act as an authentication layer between your Frontend VueJs application and the ‘IBM AppID’ service. This application makes use of the ‘Express’ framework (to serve URL’s for authentication) and the openid-client module to perform the oauth communication with IBM AppID.
Create a ‘package.json’ file in your newly created folder: e.g. ‘nodejs-authentication’:
# cat package.json
{
  "name": "authentication-nodejs",
  "version": "1.0.0",
  "description": "",
  "main": "server.js",
  "scripts": {
    "start": "node server.js"
  },
  "author": "",
  "license": "ISC"
}
Add the required node-modules to your node.js project:
# npm i express express-session dotenv
# npm i [email protected]
Create a ‘server.js’ file:
require('dotenv').config();
const { Issuer } = require('openid-client');
const express = require('express');
const session = require('express-session');

const app = express();
const port = 3000;

app.use(session({
  secret: '123456',
  resave: true,
  saveUninitialized: true
}));

Issuer.defaultHttpOptions = { timeout: 15000 }

const issuer = new Issuer({
  issuer: process.env.APPID_OAUTHSERVERURL,
  authorization_endpoint: process.env.APPID_OAUTHSERVERURL+'/authorization',
  token_endpoint: process.env.APPID_OAUTHSERVERURL+'/token',
  userinfo_endpoint: process.env.APPID_OAUTHSERVERURL+'/userinfo',
  jwks_uri: process.env.APPID_OAUTHSERVERURL+'/publickeys',
});
console.log('Issuer %s %O', issuer.issuer, issuer.metadata);
issuer.defaultHttpOptions = { timeout: 15000 }

const client = new issuer.Client({
  client_id: process.env.APPID_CLIENTID,
  client_secret: process.env.APPID_SECRET
});

let authorizationUrl = client.authorizationUrl({
  redirect_uri: process.env.REDIRECT_URL_CALLBACK,
  scope: 'openid email profile'
});
console.log(authorizationUrl)

app.get('/callback', (req, res) => {
  client.authorizationCallback(process.env.REDIRECT_URL_CALLBACK,
    req.query, { 'response_type': 'code' })
    .then(function (tokenSet) {
      client.userinfo(tokenSet.access_token)
        .then(function (userinfo) {
          res.redirect(process.env.REDIRECT_URL_WEB_APP +
            '?name=' + userinfo.name +
            '&email=' + userinfo.email +
            '&id_token=' + tokenSet.id_token +
            '&access_token=' + tokenSet.access_token
          );
        })
        .catch(function (error) {
          console.log(error);
          res.redirect(process.env.REDIRECT_URL_WEB_APP);
        })
    })
    .catch(function (error) {
      console.log(error);
      res.redirect(process.env.REDIRECT_URL_WEB_APP);
    })
})

app.get('/loginurl', (req, res) => {
  res.json({ loginUrl: authorizationUrl });
})

app.get('/login', (req, res) => {
  res.redirect(authorizationUrl);
})

app.get('/health', (req, res) => {
  res.send('up');
})

app.get('/', (req, res) => {
  res.send('up');
})

app.listen(3000, () => console.log('Listening on port 3000'))
Create a file “.env” – see sample below
APPID_OAUTHSERVERURL=https://us-south.appid.cloud.ibm.com/oauth/v4/8f1d603d-2a03-4fa5-8d3b-2218c200929e
APPID_CLIENTID=xxx
APPID_SECRET=xxx
REDIRECT_URL_CALLBACK=http://localhost:3000/callback
REDIRECT_URL_WEB_APP=http://localhost:8080/loginwithtoken
Update each value with your own IBM App ID values as noted in the previous step Also verify that the “REDIRECT_URL_WEB_APP” url points to your application.
Start the application and check if you get the login screen from IBM App ID when clicking the Login-button on the navigation bar.
# npm start
You will probably get an error “Invalid redirect_uri”. To solve this, goto to your AppID service instance -> Manage Authentication -> Authentication Settings and add http://localhost:3000/* as a web redirect URL.
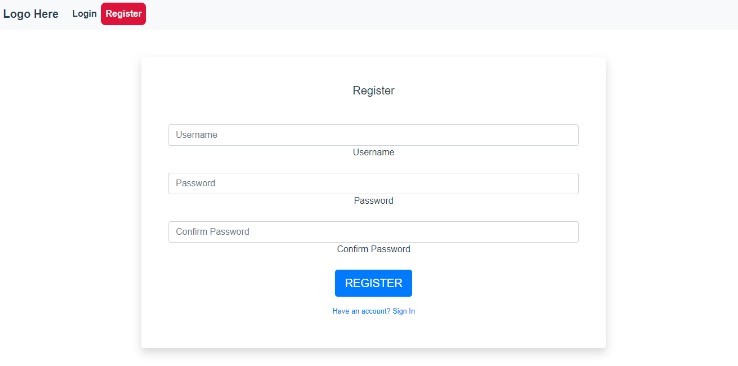
As a final step we need to create the “REDIRECT_URL_WEB_APP”-url in our application. This url e.g. “http://localhost:8080/loginwithtoken” will be called by our NodeJS application and will process the userid and tokens to store them into our Vuex store so we can keep track of the logged user.
Create a new file Login.vue in the src directory of your VueJS application
The contents of Login.vue should look as follows:
<template>
  <div class="login">
    <h4 style="margin-top:30px;margin-bottom:30px">Logging in ...</h4>
  </div>
</template>

<script>
export default {
  name: "Login",
  mounted() {
    let name = this.$route.query.name;
    let email = this.$route.query.email;
    let idToken = this.$route.query.id_token;

    let payload = {
      name: name,
      email: email,
      idToken: idToken
    }

    if (name && email && idToken && name != '' && email != '' && idToken != '') {
      this.$store.commit("login", payload);
    }
    else {
      this.$store.commit("logout");
    }

    this.$router.push("/");
  }
};
</script>

<style scoped>
</style>
This will process the username, email and token end store those in the state variables in our Vuex-store. Finally it will force a reload of the root home page.
Add a route to /loginwithtoken on our application
Edit src/router/index.js:
- import the Login.vue file
import Login from '../Login.vue'
- add a URL-path for the router
{ path: '/loginwithtoken', name: 'loginwithtoken', component: Login },
The index.js file should now look like this:
import Vue from 'vue'
import VueRouter from 'vue-router'
import Home from '../views/Home.vue'
import Login from '../Login.vue'

Vue.use(VueRouter)

const routes = [
  {
    path: '/',
    name: 'Home',
    component: Home
  },
  { path: '/loginwithtoken', name: 'loginwithtoken', component: Login },
]

const router = new VueRouter({
  mode: 'history',
  base: process.env.BASE_URL,
  routes
})

export default router
This concludes the installation instructions to develop a Store application and run it locally.
Optionally, if you want to persist the Vuex-store, perform the following steps: (this prevents for example that an end-user loses his cart contents when logging in)
- install the npm module
npm install --save vuex-persistedstate
- Edit the file src/store/index.js
import Vue from 'vue'
import Vuex from 'vuex'
import createPersistedState from "vuex-persistedstate";

Vue.use(Vuex)

const url = "http://localhost:8080/products";
const headers = { Accept: "application/json" };

export default new Vuex.Store({
  plugins: [createPersistedState()],
  state: {
    products: [],
    inCart: [],
    user: {
      isAuthenticated: false,
      name: "",
      email: "",
      idToken: ""
    },
    endpoints: {
      login: "http://localhost:3000/login"
    },
   },
...
Deploy a VueJS application to RedHat OpenShift
In this section we will describe how to take production-ready VueJS-code (Html & Javascript), push it into a Nginx docker container and deploy it on OpenShift.
- Goto the root of your ‘Shopping-Cart’ folder and create a build from your VueJS project
# npm run build
This will create a minified version of you website that is ready to be deployed in the /dist folder of your project. All you need to do now is to serve these static resources in a web server like e.g. Nginx (additional info can be found here: https://www.openshift.com/blog/deploy-vuejs-applications-on-openshift)
- Prepare Nginx
Create a nginx.conf file into the main project directory:
# nginx.conf
worker_processes auto;

pid /tmp/nginx.pid;

events {
 worker_connections 1024;
}

http {
 include /etc/nginx/mime.types;
  client_body_temp_path /tmp/client_temp;
 proxy_temp_path       /tmp/proxy_temp_path;
 fastcgi_temp_path     /tmp/fastcgi_temp;
 uwsgi_temp_path       /tmp/uwsgi_temp;
 scgi_temp_path        /tmp/scgi_temp;

 server {
   listen 8080;
   server_name _;

   index index.html;
   error_log  /tmp/error.log;
   access_log /tmp/access.log;

   location / {
     root /code;
     try_files $uri /index.html;
   }
 }
}
- Create a “Dockerfile” in the main project directory:
FROM nginx:1.17
COPY ./nginx.conf /etc/nginx/nginx.conf
WORKDIR /code
COPY ./dist .
EXPOSE 8080:8080
CMD ["nginx", "-g", "daemon off;"]
- A this stage you can already build and run the container locally
# docker build -t shopping:1.0 .
# docker run -d --rm --name shopping-cart -p 8080:8080 shopping:1.0
This will start the container. The -d argument tells docker to run in the background. The –rm is used so that the container image is destroyed once you run ‘docker stop’. The –name is a label for your container. The -p maps port 3000 on your local machine to port 8080 in our container. This is the port on which nginx is running according to our config file. Finally, shopping-cart is the name you gave to the container you built.
# docker stop shopping-cart
Deploy to OpenShift
In order to avoid having to run the “npm run build” locally we can also use a Dockerfile as a two-step process. Replace the existing Dockerfile with the following:
# build stage
FROM node:lts-alpine as build-stage
WORKDIR /app
COPY package*.json ./
RUN npm install
COPY . .
RUN npm run build

# production stage
FROM nginx:1.17
COPY ./nginx.conf /etc/nginx/nginx.conf
WORKDIR /code
COPY --from=build-stage /app/dist .
EXPOSE 8080:8080
CMD ["nginx", "-g", "daemon off;"]
This will first build a NodeJS container which will be used to create our production-ready code into a folder /dist. The second part of the Dockerfile will take the /dist folder from the first step and add it to a new Nginx container.
For this you will need to check-in your project into a new github repository. Make sure you put the Dockerfile into the root of your project directory !
Once your project is in sync with the gitub repository, open up the Openshift Web-console: Goto the Developer perspective and click “Add” from the menu on the left.
- Select Import from Git
- Fill in the “Git Repo URL” which points to your project on github
- Click “Show Advanced Git Options” and specify the “Git Reference” to point to your branch. This is only needed if your branch is different than “master” !
- Change the ‘Application Name’ and ‘Name’ accordingly or accept the defaults
- Finally Click “Create”
This should result in a full deployment of the application. the “Build Config” will create a “Build” to construct the final image. Once the Deployment has completed, you can verify the application is working correctly by clicking on the generated route URL.
Adding a Github Webhook to automatically update the Openshift deployment as soon as new code is pushed into the repository:
- Goto the “Build Config” and select your specific Build Config
- Click the Github “Copy URL with Secret”
- Goto to your Github project on “github.com” and select “Settings” -> Webhooks
- Add a new webhook and paste the URL copied in previous step in “Payload URL”
- Select “application/json” as Content Type
- Click “Add webhook”
- The result of this configuration will trigger a new build run on Openshift as soon as new code gets committed into the repository.
Add variables to create a more dynamic application environment
- Add a “.env” file into the root of your project
VUE_APP_AUTH_URL="http://localhost:3000/login"
VUE_APP_PRODUCTS_URL="http://localhost:8000/products"
- Update src/store/index.js
import Vue from 'vue'
import Vuex from 'vuex'

Vue.use(Vuex)

var url;
const headers = { Accept: "application/json" };

export default new Vuex.Store({
  state: {
    products: [],
    inCart: [],
    user: {
      isAuthenticated: false,
      name: "",
      email: "",
      idToken: ""
    },
    endpoints: {
      login: "http://localhost:3000/login",
      products: "http://localhost:8000/products"
    },
   },
   getters: {
    products: state => state.products,
    inCart: state => state.inCart,
   },
   mutations: { //synchronous
     setProducts(state, payload) {
       state.products = payload;
     },
     addToCart(state, payload) {
      console.log(payload);
      state.inCart.push(payload);
     },
     removeFromCart(state, item) {
       state.inCart.splice(item, 1);
     },
     logout(state) {
      state.user.isAuthenticated = false;
      state.user.name = "";
      state.user.email ="";
      state.user.idToken ="";
     },
     login(state, payload) {
      state.user.isAuthenticated = true;
      state.user.name = payload.name;
      state.user.email =payload.email;
      state.user.idToken =payload.idToken;
     },
     setUrls(state) {
       state.endpoints.login = process.env.VUE_APP_AUTH_URL;
       state.endpoints.products = process.env.VUE_APP_PRODUCTS_URL;
       url = state.endpoints.products;
       console.log(process.env);
     }
   },
   actions: { //asynchronous
     async getProducts(state) {
       const products = await fetch(url, { headers });
       const prods = await products.json();
       state.commit("setProducts", prods);
       console.log(prods);
     }
   },
  modules: {
  }
})
This will set the URL’s into the store state variables, taken from the .env file
- Modify App.vue to set the URL’s at load time:
<template>
  <div id="app">
    <NavHeader />
    <router-view/>
  </div>
</template>

<script>
import NavHeader from "@/NavHeader.vue"
export default {
  components: {
    NavHeader
  },
  mounted(){
    this.$store.commit("setUrls");
    this.$store.dispatch("getProducts");
  }
}
</script>

...
At this point you should be able to access your application using the generated application URL but you might not see any products ! If that is the case, check the console log using the ‘inspect’ function within your chrome browser.
-
Now you can also set the URL variables as part of the Build Config in OpenShift:
- Goto “Build Configs” and select your build config
- Click on the tab “Environment”
- Set the 2 variables : “VUE_APP_AUTH_URL” and “VUE_APP_PRODUCTS_URL” to values that reflect your environment.
- Run a new build
- Once the Build is completed, check the Web application and inspect the console within the browser and watch the updated environment variables as part of the console logging.