No need to keep checking your training. Add just 1 import line and MLNotify will let you know the second it’s done.
Features:
- Just
pip install mlnotifyandimport mlnotifyto get started - Out-of-the-box email & push notifications on desktop, mobile
- Support for most major ML frameworks (as in Keras, LightGBM, SKLearn, XGBoost, Tensorflow)
- A simple & intuitive UX
- Fully secure – no sensitive data leaves your machine (only training start time / end time)

Quickstart
pip3 install mlnotify
# STEP 1: Import package
import mlnotify

# STEP 2: Do your thing.
my_model.fit(...)

# STEP 3: Browse to mlnotify.com and get notified when training is done!
The import will automagically hook into your fit/train method.
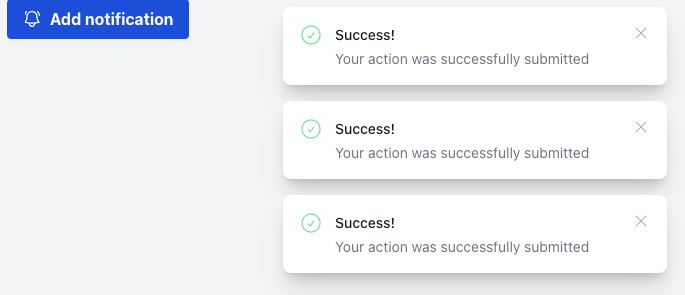
- Once you start training your model a tracking url & QR code will be printed to the console.

- Enter the tracking url
- Grab a coffee and relax, the tracking url will notify you when the training is complete via desktop, mobile, or email notifications
Usage
Simple
import mlnotify
This will automagically hook into your fit/train method.
Supported ML frameworks:
Jupyter Notebook
import mlnotify
And in any Jupyter cell:
%%notify
...
Works with line magic, too
%notify your_code()
Manual
The library also exports a manual API to be used if you want to do it manually.
import mlnotify

mlnotify.start() # Start tracking
# ...
mlnotify.end() # End tracking
Advanced
The library uses a simple plugin architecture. You can register your own plugins to extend the library’s functionality.
from mlnotify import BasePlugin, plugin_manager

# A plugin is simply a class with `before` and `after` methods
class MyPlugin(BasePlugin):
    def before(self, *args, **kwargs):
        # Called before the fit/train method
        print("MyPlugin: training started")

    def after(self, *args, **kwargs):
        # Called after the fit/train method
        print("MyPlugin: training finished")

plugin_manager.register_plugin(MyPlugin())

# Use mlnotify as you normally would
model.fit(...)
API
The library exports four items:
from mlnotify import start, end, plugins_manager, BasePlugin
start() -> None
Starts tracking.
end() -> None
Ends tracking.
plugins_manager: PluginsManager
The class handling all plugin registration and invocation.
Methods:
-
plugins_manager.register_plugin(plugin: BasePlugin) -> NoneRegisters a plugin.
-
plugins_manager.clear_plugins() -> NoneRemoves all registered plugins.
Security
No sensitive data is sent to the MLNotify server – only training start & end time.
Contribution, self-deployment & local development
Contributions and self-deployments are more than welcome.
Website & API
This project relies heavily on SaaS products, and must receive proper config for Netlify, Firebase and SendGrid for it to work. You can run this project locally using the Netlify CLI:
- Make sure you installed the Netlify CLI globally:
npm install -g netlify-cli - You must have the following environment variables set:
FIREBASE_SERVER_CERT– a stringified JSON containing the firebase server config (it contains the following keys: {type, project_id, private_key_id, private_key, client_email, client_id, auth_uri, token_uri, auth_provider_x509_cert_url, client_x509_cert_url})GRIDSOME_FIREBASE_APP_CONFIG– a stringified JSON containing the firebase client config (it contains the following keys: {apiKey, projectId, messagingSenderId, appId})SENDGRID_API_KEY– a string containing the SendGrid API Key
cd websitenetlify dev
SDK
pip install ./sdk- Write a python file using the SDK and just
import mlnotify