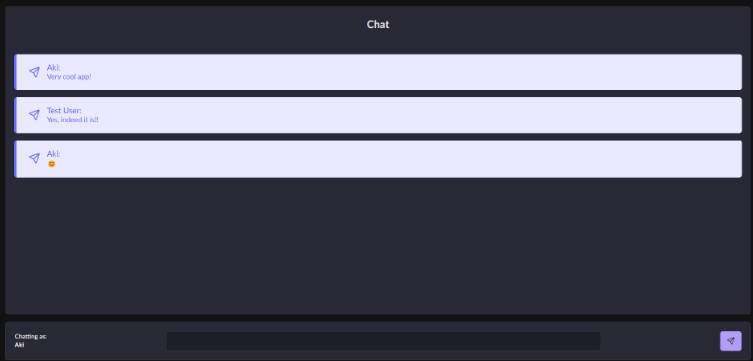
? Astro Chat ?
Real Time Chat Application created with VueJS, Express, Socket IO and MongoDB/Mongoose/Mongo Altas.

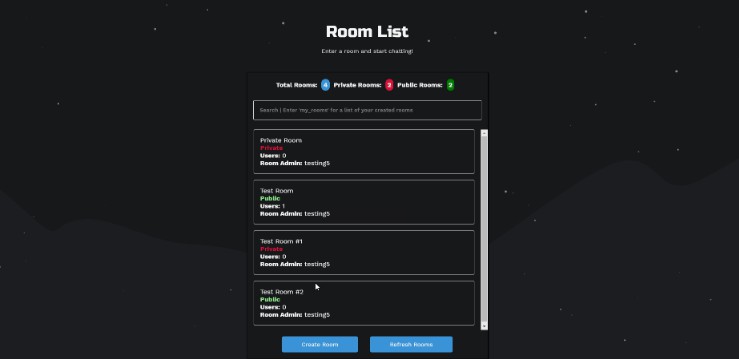
Demo
View the application at https://astro-chat-io.herokuapp.com/
Tech Stack
| Technology | Description | Link ↘️ |
|---|---|---|
| HTML5 | Hyper Text Markup Language | —- |
| CSS3 | Cascading Style Sheets | —- |
| JavaScript | High Level, Dynamic, Interpreted Language | —- |
| SASS | Syntactically Awesome Style Sheets | https://sass-lang.com/ |
| Babel | Javascript Compiler | https://babeljs.io/ |
| Webpack | Javascript Module Bundler | https://webpack.js.org/ |
| NodeJS | Open Source, Javascript Run Time Environment, Execute Javascript code for server side | https://nodejs.org/en/ |
| VueJS | Progressive Javascript Framework | https://vuejs.org/ |
| Jest | Javascript Testing Framework | https://jestjs.io/ |
| Express | Web Framework for Node.js | https://expressjs.com/ |
| MongoDB | NoSQL Database | https://www.mongodb.com/ |
Features
- Express as the web framework on the server
- Implements stateless authentication with JWT tokens
- Authenticates JWT and social authentication using Passport
- Hashes passwords using the bcryptjs package
- Enables real time communication to the server using Socket IO
- MongoDB and Mongo Atlas is used for storing and querying data
- Server logging is done with Winston and Morgan
- Concurrently is used to run both the server and client at the same time
- Vue JS is used as the frontend framework
- Travis CI is incorporated for continuous integration
- Heroku is used for production deployment
Installation
Running Locally
Ensure Node.js and NPM are installed
- Clone or Download the repository (Depending on whether you are using SSH or HTTPS)
$ git clone [email protected]:dalmatian315/astro-chat.git
$ cd astro-chat
- Install dependencies for root, client and server
You will need to npm install in each directory in order to install the node module needed for each part of the project
Directories Include: Root, Server & Client
-
Add .env file to server folder and fill out details according to the .env.example. See configuration details for social auth and database setup: Note, this is mandatory for the application to run
-
Set NODE_ENV=development and HEROKU_DEPLOYMENT=false
-
Start the application
$ npm run dev
Your app should now be running on localhost:8080.
Run [Production Ready] Mode
Ensure Node.js and NPM are installed
This runs the application with the built production ready Vue files as well as running the express server in production mode serving up the compiled files.
- Clone or Download the repository (Depending on whether you are using SSH or HTTPS)
$ git clone [email protected]:dalmatian315/astro-chat.git
$ cd astro-chat
- Install dependencies for root, client and server
You will need to npm install in each directory in order to install the node module needed for each part of the project
Directories Include: Root, Server & Client
-
Add .env file to server folder and fill out details according to the .env.example. See configuration details for social auth and database setup. Note, this is mandatory for the application to run
-
Ensure you set NODE_ENV=production and HEROKU_DEPLOYMENT=false
-
Start the application in the root folder of the project. Since it’s running in production mode, you should not see any message such as: “Server started at port 5000”
$ npm run start
Your app should now be running on the port you specified in the .env file. If none was specified it will default to port 5000.
Eg. localhost:5000.
Deploying to Heroku
Ensure you have Heroku CLI installed
- Login to heroku via the CLI
$ heroku login
- Create a new Heroku Application
$ heroku create
-
Before pushing to heroku, you need to set up the config variables in other words the env variables you would use if you were doing this locally
i. Go to Settings -> Reveal Config Vars
ii. Add the config variables according to the .env.example
iii. These Include
HEROKU_DEPLOYMENT=true
DATABASE_URL
FACEBOOK_CLIENT_ID
FACEBOOK_CLIENT_SECRET
GOOGLE_CLIENT_ID
GOOGLE_CLIENT_SECRET
JWT_SECRET
NPM_CONFIG_PRODUCTION (Must be false)
PORT (Optional)
iv. Ensure that you add NPM_CONFIG_PRODUCTION to false to allow installation of dev dependencies for post build to work correctly
-
Commit any changes and push your code from local repo to your git
$ git add -A
$ git commit -m "insert message here"
$ git push heroku master
- Open the heroku app
$ heroku open
Note: You may also connect your github repo to the heroku and add automatic deployment on push to the github repo
Seeding Data
If at anytime in development you’d like to quickly seed some dummy data you use the command below
$ npm run seed:data
Running Tests
Tests should be run before every commit to ensure the build is not broken by any code changes.
Running Both Client and Server Tests
In the root directory
$ npm run test
Running Client Tests
$ npm run client:test
Watching Server Tests
$ npm run server:test:watch
Configuration Setup
These configuration setups are necessary for the app to function correctly as intended. These configuration setups will be required to be added as environment variables for the server to make use of.
Local Environment Variables (.env file)
For development you will need a .env file for environmental variables.
Note: These are required for the application to be setup correctly
NODE_ENV=development
HEROKU_DEPLOYMENT=false

DATABASE_URL=DATABASE_URL

EXPRESS_SESSION_KEY=EXPRESS_SESSION_KEY
JWT_SECRET=JWT_SECRET

GOOGLE_CLIENT_ID=GOOGLE_CLIENT_ID
GOOGLE_CLIENT_SECRET=GOOGLE_CLIENT_SECRET

FACEBOOK_CLIENT_ID=FACEBOOK_CLIENT_ID
FACEBOOK_CLIENT_SECRET=FACEBOOK_CLIENT_SECRET

PORT=PORT
MongoDB & Mongo Atlas
A MongoDB URI is needed to connect to a MongoDB connection. The easiest way to do this is to use Mongo Atlas. If you’d like to do this locally you can follow the instructions at (https://docs.mongodb.com/manual/installation/)
Mongo Atlas
-
Select ‘Build a New Cluster’ and follow the prompts
-
When the Cluster has been created, click on ‘Connect’
-
Choose your connection method, for the purposes of this application we will use ‘Connect Your Application’
-
Next you will need to grab this connection string (Standard connection string). This is the URI that will be used as an environment variable
JWT Secret
The JWT Secret is required as a way to keep the JWT Token secure when the signature is hashed. This secret key should be secret to you and should be updated periodically.
To setup google oauth, you’ll need to configure some details through Google Cloud Platform
-
Navigate to https://console.cloud.google.com/
-
Using ‘APIs & Services’, you’ll need to enable the ‘Google+ API’
-
Once enabled, click on ‘Credentials’
-
Go to ‘OAuth Consent Screen’, you will need to add the ‘Authorized Domains’ to authorize your domain with Google
-
You will need to save the Client ID and Client Secret for use in the environment variables
-
You will also need to add the domain you are using ie. localhost or heroku to both ‘Authorized Javascript Origins’ and ‘Authorized Redirect URIs’
i. The redirect URIs are in the format of domain/api/auth/provider/redirect
To setup facebook oauth, you’ll need to configure some details through Facebook for Developers
-
Login at https://developers.facebook.com/
-
Go to ‘My Apps’ and create a new app
-
Navigate to Settings -> basic
-
Save the App ID and App Secret for use in environment variables
-
Add your app domain in ‘App Domains’
-
Under Products -> Facebook Login -> Settings, Add your redirect URIs under ‘Valid OAuth Redirect URIs’
i. The redirect URIs are in the format of domain/api/auth/provider/redirect
Contribute
Built as a personal project for learning experience. Please feel free to contribute by creating issues, submitting new pull requests!