Tamiat CMS
Vuejs and Firebase based CMS.
Getting Started
To get started with Tamiat CMS, you have two options:
- Making Tamiat your starting point.
- Integrating Tamiat into an existing project.
Making Tamiat Your Starting Point
- Clone the CMS repository and install the dependencies.
# clone the repo
git clone https://github.com/tamiat/tamiat.git

# install the dependencies
npm install
# or
yarn
- Log in to firebase console using your google account and create a new firebase project.
- In the authentication section, add a new user by providing an email and a password.
- Rename
database.rules.json.tmpfile in root folder todatabase.rules.json
- Setup your database basic security rules by going to the
database.rules.jsonfile in your project and fill in your UID.
{
  "rules": {
    ".write": "(auth.uid === yourUID) || (auth.uid === anOtherUID)" // you can chain these together like so
yourUID and anOtherUID are the uids of users with permission to write to the database. They look something like this "Lxgqp3FmcPVU6UYO6gNdkn1i0ok1". You can obtain a user uid from the authentication section in the firebase console.
- Navigate to
/src/admin/firebase_configand renameconfig.js.tmptoconfig.js
- Copy your project configurations from WEB SETUP (in Authentication section of firebase console) and paste them in
config.jsfile by replacing the existing ones.
// replace the existing config object below with your configurations
const config = {
  apiKey: 'AIzaSyCnxuLX6AgMduDMLtSJVDNJhR8xuMNvs4Y',
  authDomain: 'tamiat-demo.firebaseapp.com',
  databaseURL: 'https://tamiat-demo.firebaseio.com/',
  projectId: 'tamiat-demo',
  storageBucket: '',
  messagingSenderId: '188459960333'
}
- Run the
firebase initcommand (if you haven't installed firebase yet, do so bynpm install -g firebase-tools), select your firebase project from the list, use the default database rules already presentdatabase.rules.json, choosedistas your public directory and configure the project as a single-page app.
- Make sure
.firebasercis created in your project root directory and the file contains the project id of firebase project you created earlier
- You can now use
firebase deployto deploy the security rules you just entered (to deploy the actual web app you must first usenpm run buildoryarn build).
- Run the local dev server with
npm run devoryarn dev.
- Access the admin interface by navigating to
localhost:8080/admin.
- Sign in with your previous email and password.
- (Optional) Navigate to Database menu from sidebar to add demo contents from
tamiat.config.json
- Enjoy!
Integrating Tamiat Into an Existing Project
- Create a new vue.js project based on webpack template.
vue init webpack my-project
# install webpack template dependencies
npm install
- Install the required dependencies by Tamiat.
cd my-project

# install development dependencies
npm install node-sass sass-loader --save-dev

# install production dependencies
npm install moment vue-router bulma firebase vuefire font-awesome vue-quill-editor
- In
main.jsfile, import the external stylesheets and the necessary plugins and activate them.
import router from './router'
import VueFire from 'vuefire'
import VueQuillEditor from 'vue-quill-editor'

// import external stylesheets
import fontAwesome from '../node_modules/font-awesome/css/font-awesome.css'
import bulma from '../node_modules/bulma/css/bulma.css'

Vue.use(VueFire) // activate vuefire plugin
Vue.use(VueQuillEditor) // activate vue-quill-editor
Remember, don't forget to add the
routerproperty to the vue instance.
new Vue({
  el: '#app',
  router, // this property should be added to the vue instance
  template: '<App/>',
  components: { App }
})
- Clean up your
App.vuefile by deleting the extra content and making it similar to that:
<template>
  <div id="app">
    <router-view></router-view>
  </div>
</template>
- Now, open the Tamiat CMS repo and copy the following folders and files:
Folders to be copied:
| Source | Target | Description |
|---|---|---|
| Tamiat/src/admin | my-project/src/admin | The building blocks of the admin interface |
| Tamiat/src/app | my-project/src/app | The building blocks of the app interface |
| Tamiat/src/router | my-project/src/router | The routing logic of the CMS |
-
Once this is done, you can just follow the same instructions of the first option above starting from
step 2. -
Enjoy!
Features
- Front end focused CMS
- Powered by [Vue][] 2.0 & [Firebase]
Routing
In Tamiat CMS, there are reserved routes that are built in the CMS itself as well as dynamic routes that you can create yourself.
What benefit it offers
With dynamic routes you are in complete control and have the total freedom about the presentation of your content. You can associate the content that you want with the template that you want and give them the url that you want.
How to create a dynamic route
In order to create a dynamic route you have to go to the Routing section in Tamiat admin area.

On the right side, you can see the reserved routes in the CMS (you can not create dynamic routes with these paths).
On the left side you see the form that you need to fill in to create a new dynamic route. This form consists of 4 inputs:
- The route path
- The route template
- The route content type
- The route content
The only required fields in the form are path & template. The other fileds: Content type & Content are optional since some templates are static and don't accept any dynamic content to show. This type of templates shows static content instead (like the default About us template).
After you fill in the form and click the add button, the dynamic route will be created and added to the Dynamic routes on the right hand side. There, you can test it by clicking on the path link that will open the new route in a new browser tab.
After the creation of the new route, you will have options to edit all it's components (path, template, content type & content) in addition to completely deleting it. You just need to hove over the created route to see those control buttons.
What about creating new templates
Creating new templates is very easy. All you have to do is:
- Create a new
MyTemplate.vuefile in/src/app/templatesfolder.
<template>
  <div class="template">
    <h1>Hello, I am a new template</h1>
  </div>
</template>
- Add some info about the new template to
/src/app/templates/templates.jsonas in the following snippet of code:
[
  ...
  {
    "filename": "MyTemplate", // the name of the file you created without ".vue" extension
    "displayName": "My New Template" // The name you want your template to be called in the Routing page
  }
  ...
]
Static vs dynamic templates
Static templates are templates that contains only hard coded content. They can not be used to show dynamic content (ex: the AboutUs default template).
here is the minimal code for a static template:
<template>
  <div class="template">
    <h1>Hello, I am a static template</h1>
  </div>
</template>
On the other side, dynamic templates are used to show dynamic content in a given layout defined by the template (ex: the BlogPost default template)
Here is the minimal code for a dynamic template:
<template>
  <div class="template">
    <h1>{{content.title}}</h1>
  </div>
</template>

<script>
import LoadContent from './LoadContent'
export default {
  mixins: [LoadContent]
}
</script>
The vue mixin LoadContent will expose your content as a data object called content. There, you can access all the fields of the content you assigned to that route.
Content types/Contents/Fields
First, we have to understand the basic concepts and the DB structure.
- Content type - type from which we create specific contents - every content type has it's own
name,icon,path,fieldsanddata(Contents) - Content - actual contents created as
datain Content types - Fields - used as properties for Contents and can be created as one of the available input types (
textarea,textbox,integer,boolean,url,richtextbox,tags,select,input)
Why do we need this?
This way, everything we create is custom made. We don't have any restrictions in sense of how our content should be named, what properties(inputs) should it have, on what path should our contents be, etc.
_ For users who have used previous version of Tamiat CMS _
In order for this new feature to work, you have to do the following:
- Delete everything from DB except
media,navandsettings - Go to the
Databasesection in Tamiat admin area and addDemo ContentandDemo Fields - After this, you have successfully added the demo data and initialized the DB. Now you can continue on working with contents and fields.
How to create Content types and Fields?
In order to create content types and fields we have to go to the Content section in Tamiat admin area.
Content types

Create
To be able to create new content type we have to define the name and select one or more fields from available fields list.
On the right side we have a list of available fields. Those are the fields that are currently available in the DB.
By checking a field from that list, we decide to include it in the creation of content type.
If we want some fields to be shown later in the UI, we have to check a field from Fields list (only textbox type fields are available). Also, we can reorder fields so that they are stored in the DB as we want.
Edit/Delete
Lets look at the right section.
By selecting a content type from dropdown menu, section on the left is populated with data of selected content type.
From that point, we can choose to edit or to delete it.
Fields

Create
By clicking on Add new field button, this block is displayed.
Field name and field type are mandatory, but multi value isn't.
Edit/Delete
Next to every fields name in the available fields list, we have two icons - delete and edit.
The same block is displayed just now it's populated with selected fields data.
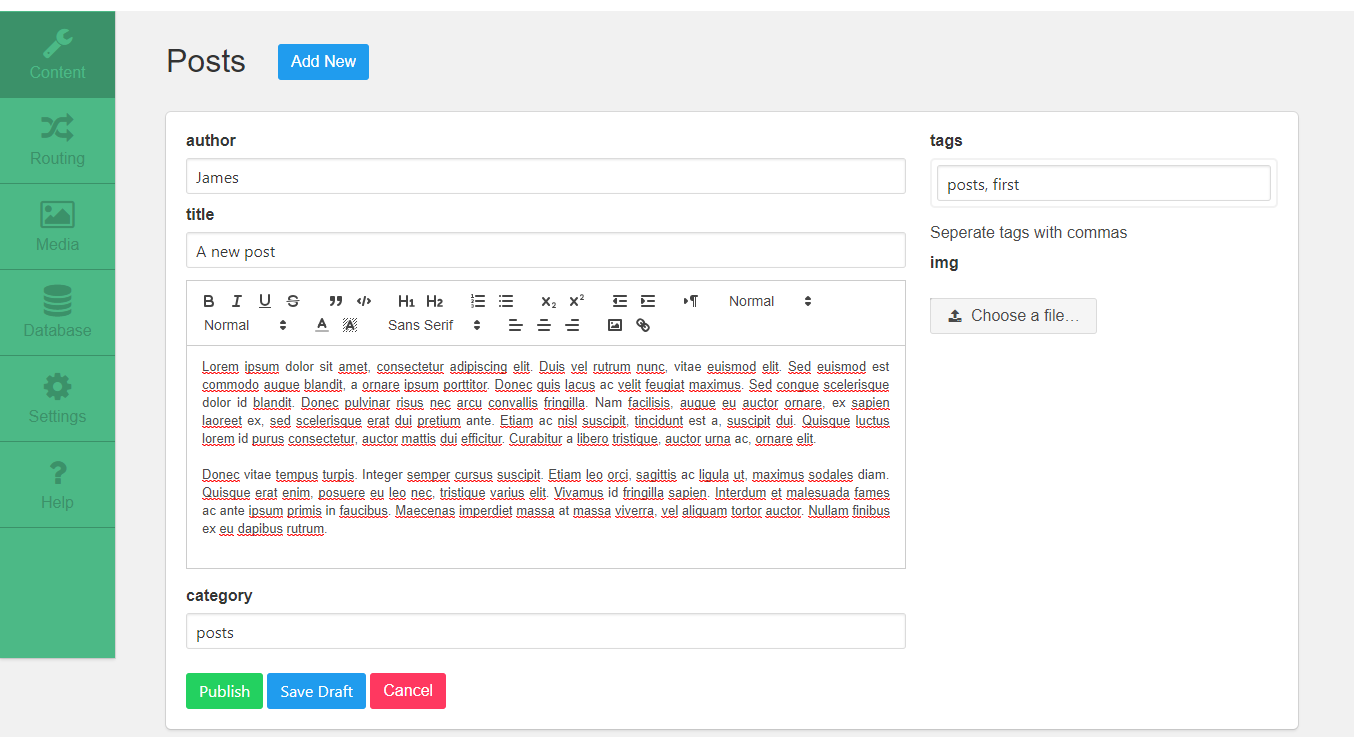
We created a new content type, what now?
After successfull creation, content types are displayed in the dropdown menu Content in Tamiat admin area.
By clicking on a specific content type, this page is displayed:

From this point, we can Create (Save/Publish), Edit, Delete, Bulk delete, Select, Filter and Sort contents.
Those contents will be displayed later in the app.
In the picture above we can see that we have newly created content type, ex. Posts, which has an actual data that is displayed in the table.
Notice that only author and title fields are displayed - because those are the textbox fields we previously marked to be shown in content list when we were creating content type.