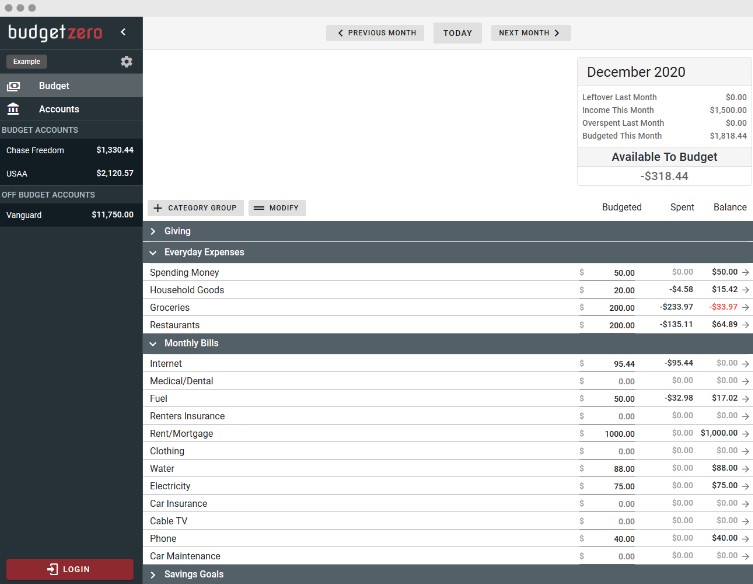
budgetzero is a free, open-source, privacy-friendly, offline-first budgeting system.
Use at budgetzero.io, download the desktop apps or self-host on your own server. Zero ads, zero trackers, just budgeting.

⚠️ budgetzero is under active development and considered an alpha version. You may encounter significant bugs and breaking changes. Feel free to file an issue! ⚠️
Features
✔️ Zero-based ‘envelope’ budgeting
✔️ Offline-first storage. NOTE: All data is stored in the browser and may be lost if you clear the browser’s data.
✔️ Import Transactions (OFX, QFX, CSV)
✔️ Carry negative balances into next month
✔️ Privacy-focused. Zero trackers & zero analytics.
Getting Started
There’s multiple ways to use budgetzero.
- On the official app.budgetzero.io page.
- Installing the desktop app (Windows or Mac). Download here
- Self host the web app. You can either deploy the docker image or build and host the static files on your own webserver. See deployment section below for more details.
⚠️ Known Issues (being worked on)
- UI Inconsistencies (pop-up boxes, colors, etc)
- Performance not tested for extremely large budgets (thousands of transactions)
- Transfer transactions work but may be a bit buggy
- Find a bug? Please file an issue!
Roadmap
- Reports – started!
- Cloud Sync through budgetzero.io (coming soon)
- Interested in Cloud Sync? Sign up to be notified when available!
- Self-hosted sync server (coming soon)
- Cross-platform desktop applications (Windows, Mac, Linux)
- Multi-month view
- Payee management
Deployment
Docker
docker pull budgetzero/budgetzero:latest
Then run with
docker run -d -p <desired_port>:8080 --name budgetzero budgetzero/budgetzero
Example:
docker run -d -p 8080:8080 --name budgetzero budgetzero/budgetzero
Your budgetzero instance is now running at <docker_IP>:<desired_port>
Manual Deployment
You can also build the static files and host on any webserver.
npm install
npm run build
The files will be built into the dist/ folder and can be hosted anywhere.
Sync Server Setup
Budgetzero uses PouchDB to store the all data client-side in the browser. In order to enable sync across multiple browsers and/or devices, you’ll need to set up a CouchDB server accessible from the desired devices. This setup guide is a general overview, feel free to adapt as needed.
Manual Setup Instructions for Advanced Users
-
Install CouchDB on a server: Manually or with the official docker couchdb image.
If you’re using docker, start CouchDB using the provided instructions.
Example:docker run -d --name budgetzero-couchdb-sync -e COUCHDB_USER=admin -e COUCHDB_PASSWORD=password couchdb:latestReplace
adminandpasswordwith desired user/password. -
Navigate to http://[docker_host_IP]:5984/_utils, which opens the Fauxton web interface for CouchDB administration.
-
Go to ‘Configuration’ and enable CORS for all domains.
-
Create a database with whatever name you desire.
-
In BudgetZero, go to Settings and set the couchdb URL to start syncing. This will need to be set up for each client/browser/computer/etc.
Examples:
http://localhost:5984/mybudget
http://username:[email protected]:5984/mybudget

Development
Pull Requests
Good pull requests (patches, improvements, new features) are a greatly appreciated.
Please ask first before embarking on any significant pull request (e.g. implementing features, refactoring code), otherwise, you risk spending a lot of time working on something that might not get accepted or is already in development.
Dev Setup
npm install
To start a development web server:
npm run serve
Run tests
Run all tests once:
npm run test:unit
Run all tests and re-run if files change:
npm run test-watch:unit
Run with debugger (chrome://inspect)
node --inspect node_modules/.bin/jest --runInBand tests/unit/Transactions.spec.js