OpenCortex
A project that opens your Quad Cortex for homebrew software.
Developing good software is hard, waiting for it might sometimes be equally as hard. With this project waiting might come to an end. Ever wondered: “A desktop file manager or editor might be useful”? You probably have at this point. The goal of OpenCortex is to open up the Quad Cortex and write the software as a community. This way we can get a taste of what is comming and maybe inspire new innovative features. Also if for some reason software support would be dropped , the maintenance could be continued by the community. It also drops the dependecy on the Cortex Cloud for preset sharing. For me personally, it’s an awesome way to learn about embedded Linux and many more things.
Disclaimer:
I am not responsible for any damage that might be done to your unit, software. Doing this might have the potential to void your warranty. This is a project for enthousiasts who like to tinker like myself. I do not intend to cause any difficulties for NDSP / myself and will approach this from an ethical standpoint. I do not condone any misuse of this project. This is purely for educational and quality of life purposes only.
What is already possible (or in better terms discovered)
Before I start of listing everything that is discovered, I want to make clear that this is currently a 1 man project and I’m doing my best to do as much as possible in the time I’ve got available. A lot of things are still in progress but every day new things get discovered. There is a lot to look at and not everything can be done at the same time. I’ll try to prioritise but roadblocks will be hit.
Everything you see here is tested as working in practice.
-
Gaining persistent access over a network connection.
-
Renaming the built in amps, pedals, etc. to whatever you like. (reboot required for changes to take effect)
-
Getting access to your backup to keep it yourself.
-
Deleting / adding presets from another device without reboot.
-
Detecting preset switches and which one is loaded.
-
Calibrating / testing the touchscreen
-
Running a webserver
Currently being worked on
-
Managing your files.
-
Manual backup management (Is it possible to load a backup saved externally? From what I’ve already seen, yes!)
-
Captures are currently unsolved. They seem to be encrypted (for good reasons) and I don’t know (yet) how they are referenced inside presets. But since the contents aren’t really relevant, I just need to find a way to reference the files correctly.
-
-
Creating an external file manager
- It is now possible to view the available presets given the XML file. In the future this will be fetched from an API running on the QC
-
Creating an external editor
-
Preset file stucture is fully reverse-engineered.
-
Building the UI
-
Testing external editing of presets and it’s limitations.
-
-
Building an RDP solution to use the native CorOS UI live on your pc.
Things that might work in the future
-
Creating an external controller: it is possible to detect preset changes and which preset is currently loaded. This can be used together with MIDI commands to create a controller that could display the current preset (like the Kemper controller).
-
Bluetooth: I’ve stumbled upon some references to bluetooth but haven’t looked into it. As far as I know it doesn’t have the hardware for it, but maybe it secretly does?
-
USB connectivity: Haven’t looked into this at all but this may end up in having some interesting things uncovered.
-
Remote brightness control: saw some interesting references but haven’t looked into it yet.
-
SD-card upgrade: on paper, when partitioning the SD-card correctly and flashing those with the corresponding .img files (you can clone from the original), you should be able to
-
Creating a OpenCortex update URL that can be accessed by the native update menu.
-
Expanding preset slots
- Got a pretty good idea how this can be done, still have to confirm it working.
Opening a shell and gaining root access
Summary
When searching for updates, the Quad Cortex uses a Python script to query NDSP’s API for new updates. This can be used as an entry point for running custom code. We will swap out this file out for a custom Python script that allows us to open a reverse shell. We can use that reverse shell to give us persistent access.
Step 1: take out the SD-card
Have you ever noticed that a Raspberry-Pi uses an SD-card to boot from, well the QC does pretty much the same in a bit more sophisticated way. I could go into detail how this works but that’s for another section.
Before continuing make sure the QC is off and unplugged!
To get access to the SD-card, you’ll have to take of the back of the QC. This is easily done by unscrewing the 4 screws in the corners. Once open, you should see the SD-card in it’s slot with a retainer around it. Unscrew the retainer to get access to the SD-card. Now you can push on the SD-card to get it out.
Step 2: mounting the SD-card
For this step it is useful to have a Linux system to work from. When plugging the SD-card into your PC running Windows, it will prompt you that the SD-card is broken and you should format it. Do not do this! The reason it does this, is because you’re trying to read Linux filesystems that are not supported on Windows. There might be ways to get around that but I’d still recommend just using a Linux system (or a VM) to do this. The guide will continue with this assumption.
When plugging it into your PC running Linux, you should see 3 partitions being mounted in your file manager. With a bit of luck there might be 4.
The SD-card does in fact contain 4 partitions:
        Device Boot      Start         End      Blocks  Id System
/dev/mmcblk0p1              33       32800     1048576  83 Linux
Partition 1 does not end on cylinder boundary
/dev/mmcblk0p2           32801       65568     1048576  83 Linux
Partition 2 does not end on cylinder boundary
/dev/mmcblk0p3           65569       67616       65536   c Win95 FAT32 (LBA)
Partition 3 does not end on cylinder boundary
/dev/mmcblk0p4           67617      973968    29003264  83 Linux
these are used for various things. The ones we are interested in, are the first 2. Upon closer investigation you will realize 2 things. They are Linux installs and they seem to be identical.
The partition we are interrested in, is the first one. This is the partition the QC will use to run it’s software. The second one is for redundancy when something goes wrong in the update process from what I understand.
Step 2.5: optional
Recommended: Clone the drive partitions as .img files in case something goes wrong.
Not Recommended: If you want to open up the QC and take out the SD-card everytime you want to change something, you can skip the next steps and go to Editing the default model names
Step 3: installing the exploit
Warning! Do not install this file from any shady places and verify the code matches the repository’s code. This can be used to leak some very personal information present on the QC.
Once inside the first partition, you want to go to the following path: /opt/neuraldsp. In here you will see a file called cloud_updater.py. Make sure to back this up! You will need to temporarily change this out for the cloud_updater_custom.py file inside this repo. Before you change this out, you will have to edit the file.
The cloud_updater_custom.py script, opens a simple reverse shell. In order for this to work, we have to listen for a reverse shell to be spawned on our PC. The script needs to now where to connect to. This is where we edit the 2 lines. At the top of the file you should see 2 variables, edit these accordingly.
YOUR_IP = "192.168.1.2" # <--- Edit this to match your PC's ip. Make sure it's on the same subnet.
YOUR_PORT = 4444    # Can stay the same or something else, rember what this is
Once that’s done, we can put the cloud_updater_custom.py file and take out the cloud_updater.py file. Again make sure you keep this file! I suggest you save this copy as cloud_updater_backup.py and keep it on the QC and also on your own PC. Now rename the cloud_updater_custom.py to cloud_updater.py. Next time you go to check for updates on the QC, your custom code will be ran.
You can put the SD-card back in the QC and screw the lid back on.
Step 4: running the exploit
Note: this might not work if an actual update is available.
[Looking into creating a custom message, if this works update the documentation]
Before doing that, we’ll need to listen for the reverse shell. This can be done using a tool called netcat. Open up a terminal and type nc -lvnp 4444 (or your custom set port).
Now on the QC, go to Settings -> Device Options -> Device Updates. When you press the button to start looking for updates, your PC should open a reverse shell.
It should look something like this:
thomas@pop-os:~/Repos/OpenCortex$ nc -lvp 4444
Listening on 0.0.0.0 4444
Connection received on 192.168.1.236 52824
/bin/sh: can't access tty; job control turned off
/opt/neuraldsp #
Congratulations, you are now inside your Quad Cortex!
Make sure to be responsible now.
Step 5: persistent access
[This might be automated in the future using the exploit script]
When running the whoami commmand, you can see that the Python script was being ran as root. This means you now have root access! With this you can do pretty much anything you want, including changing the password to something else.
Run the command passwd. This will prompt you to change the root user’s password, without confirming the current password.
You are now able to connect to your QC using SSH as root! Isn’t that wonderfull! But you may find it won’t work for you. No worries this is normal. SSH defaults to port 22. At some point, the QC actually had SSH running on the default port 22 (alongside FTP), but they got rid of those services. So I thought. After a little digging inside the SSH files, I figured out that they didn’t get rid of SSH, but they just moved it to port 57284.
So to connect to your QC you can do the following
Ip address can be found under settings -> Wi-Fi
ssh root@<QC-ip-address> -p 57284
It will prompt you for your password and after that for a fingerprint, just type “yes”, enter and:
Welcome to
 _   _                      _  ______  ___________
| \ | |                    | | |  _  \/  ___| ___ \
|  \| | ___ _   _ _ __ __ _| | | | | |\ `--.| |_/ /
| . ` |/ _ \ | | | '__/ _` | | | | | | `--. \  __/
| |\  |  __/ |_| | | | (_| | | | |/ / /\__/ / |
\_| \_/\___|\__,_|_|  \__,_|_| |___/  \____/\_|
                                        Quad Cortex
#
BOOM WE’RE IN!
Now time for some cleanup.
Step 6: restoring the update script
Now that you have persistent access, there is no need to have the exploit anymore. You can keep it, but it poses a security risk and disables the update functionality.
To restore this, just remove the custom Python script, and replace it back with the original one. This can be done with the following commands:
rm cloud_updater.py
mv cloud_updater_backup.py cloud_updater.py
Now reboot the QC and test if the updater works like it’s supposed to.
File access
Still looking for the best way to do this, currenly using the scp command to send and receive files from the QC.
Example usage:
from PC to QC:
scp -P 57284 <QC-ip-address>:<file-path>
from QC to PC
scp <PC-ip-address>:<file-path>
Editing the default model names
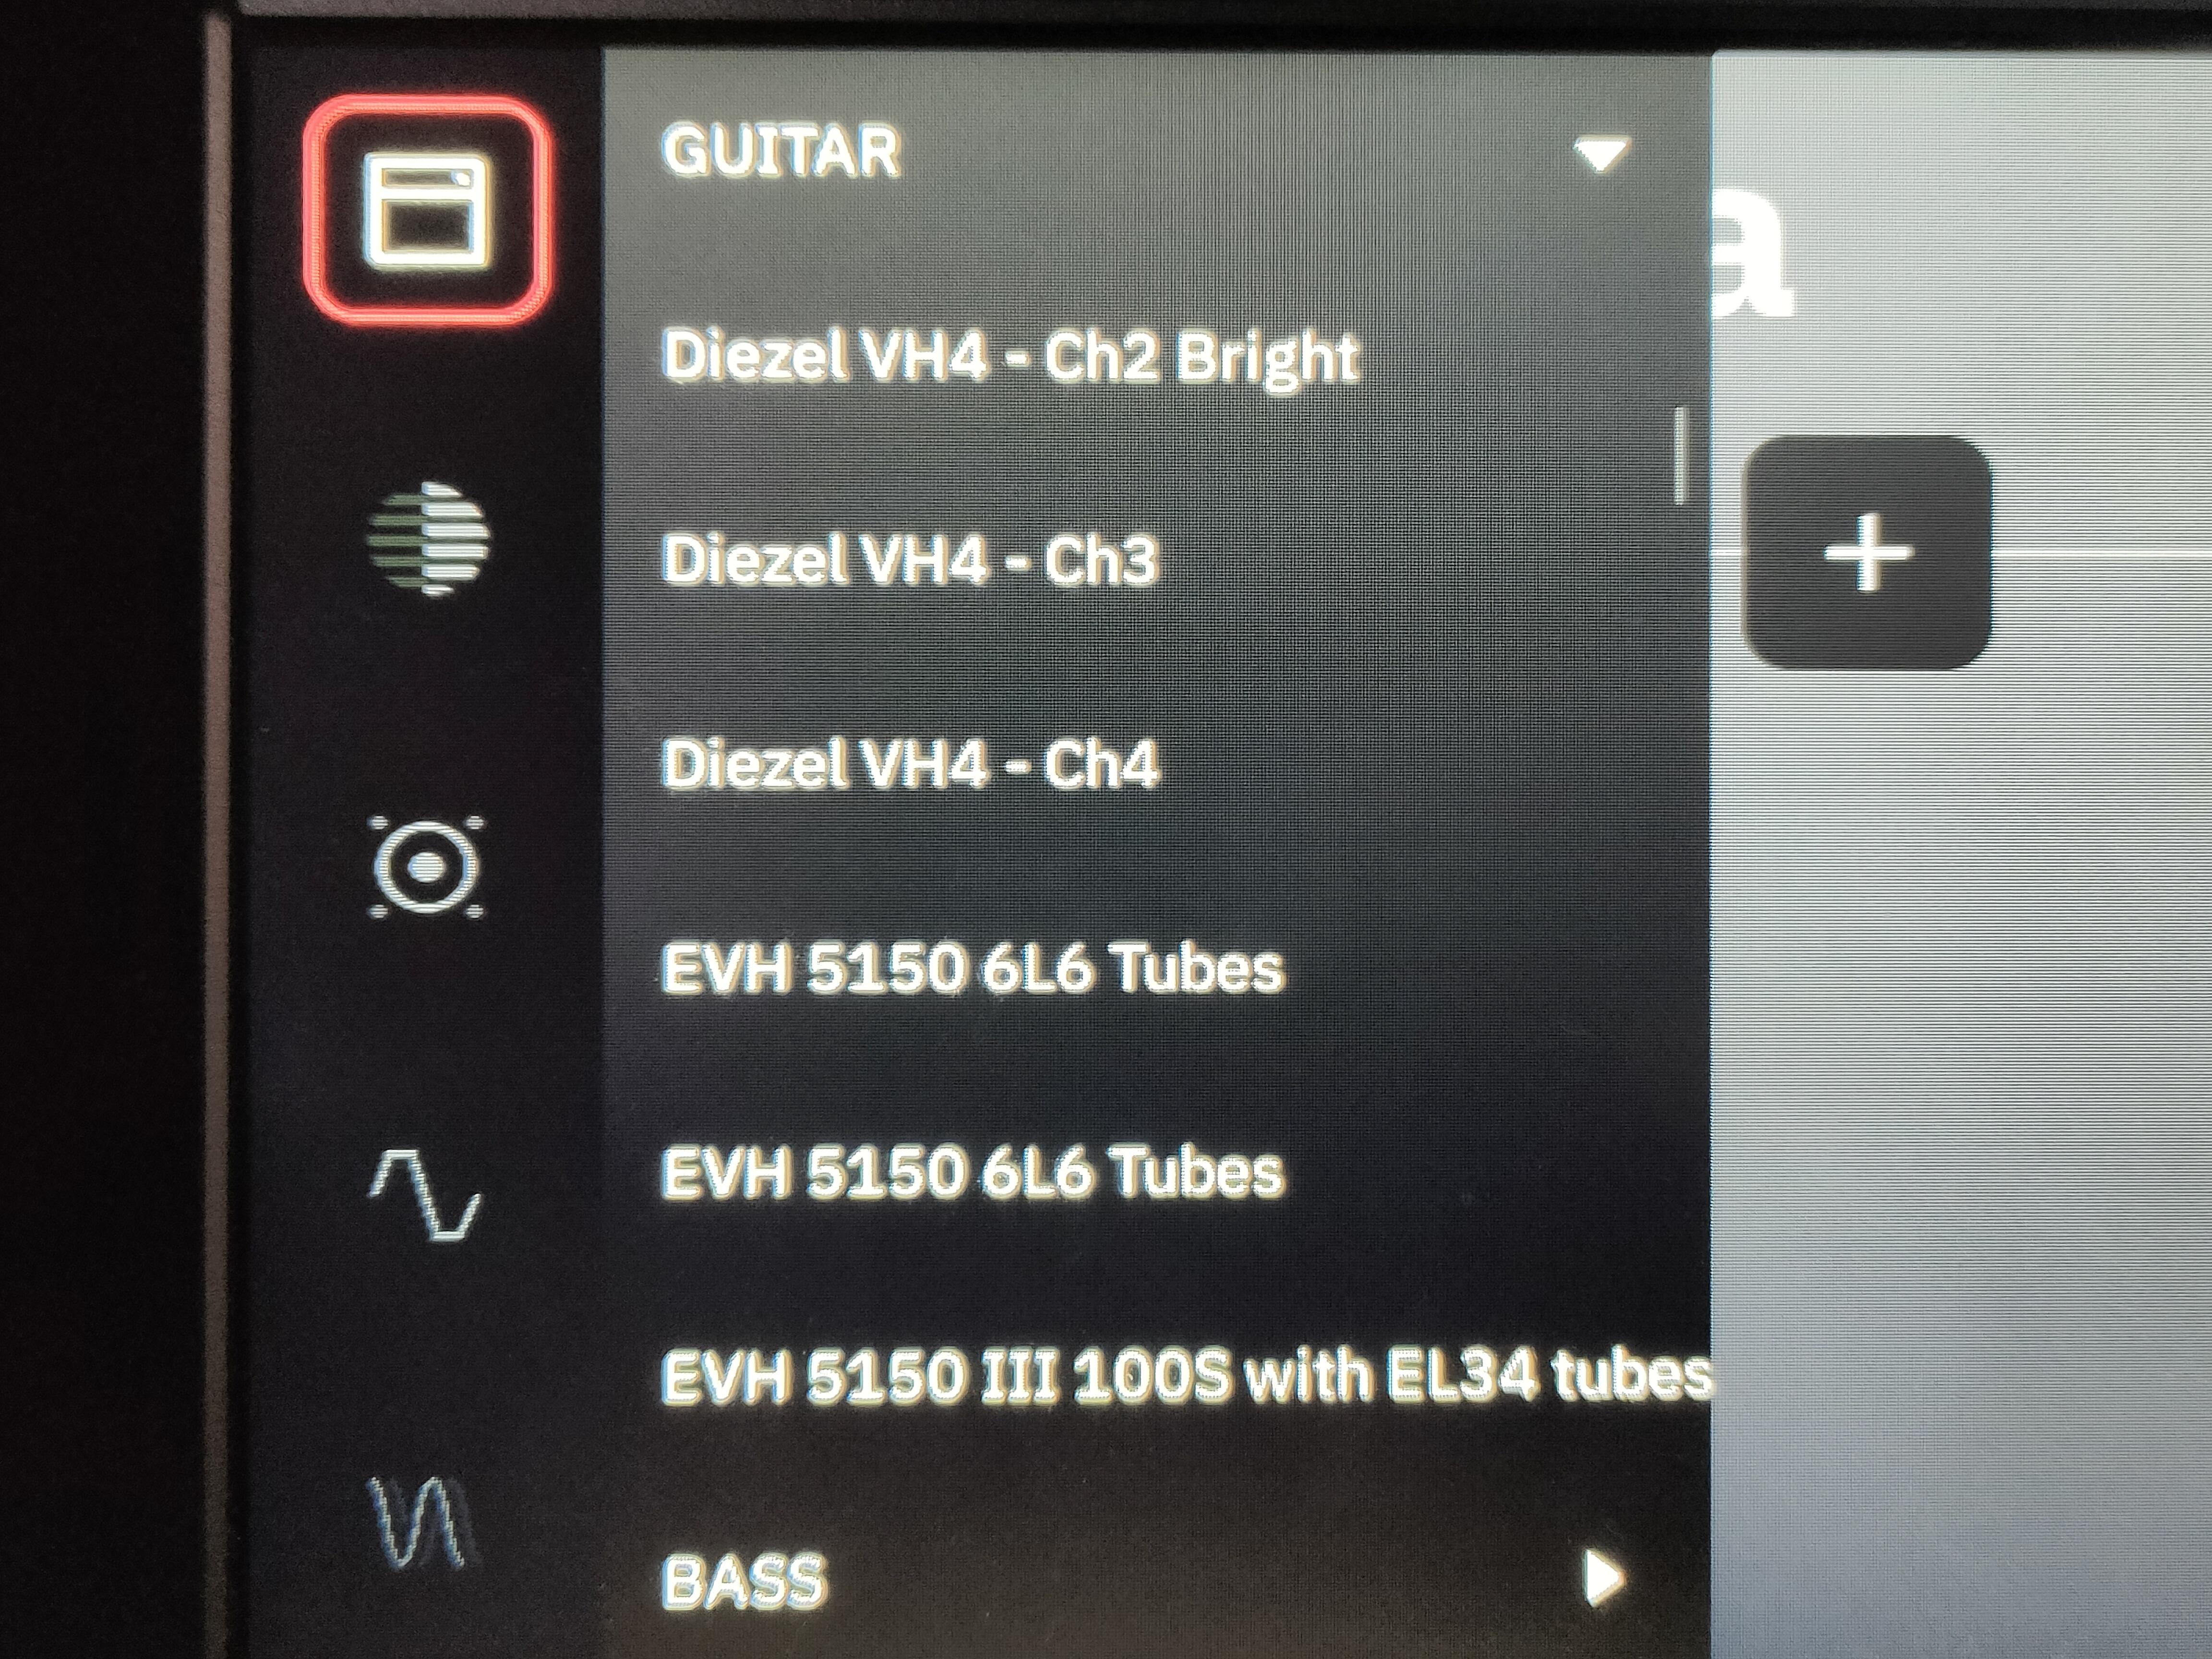
One thing bothering me (and I think a lot of other people) is the fact that companies like NDSP aren’t allowed to ship their models under the real name it is based on. Luckly they keep track of it in the actual model list, but it isn’t displayed to the user.
The models and their respective categories, names and parameters, are stored inside /opt/neuraldsp/ModelRepo.xml. In order to rename these files to the real deal, you’ve got a couple of options.
-
Rename them manually inside the XML file
-
Use the
model_renamer.pyscript in this repo to generate the XML file- Usage:
python model_renamer.py <original-modelrepo> <output-file-path> -
Use the pre-generated XML file inside
Model Repositories(make sure to match it to your CorOS verion)
Now replace the ModelRepo.xml file inside /opt/neuraldsp with the new file. Make sure this is called ModelRepo.xml.
Finally reboot your QC, now you should have all models (except captures) renamed to their real names.
Accessing your backup
Your backup is available as a compressed archive under /media/p4/downloaded_backup.tar.gz
It only contains your personal files such as captures, presets, … It does not contain any system files, so it can’t be used as a complete system restore backup.